Making a Custom Digital Snowglobe
 VelocityDesign
For the Code Snippets PDF, click here.
Introduction
Winter is objectively the best season of the year. Hot cocoa, pine trees, family tradition, sledding, and, most importantly, snow, are all favourites from this cozy season. However, winter doesn't last forever, and snow melts, much to the dismay of every five-year-old with a snowman. But, we humans have made a solution... snowglobes!
 ]
]
So much snow in a small sphere?!? What much more could a person want?
It's scientifically proven!
So, how would you like to create your own, virtual, shareable snowglobe? (I guess you don't have a choice at this point because, spoiler alert, you are doing that right about now...)
What We're Making
In this jam, we'll be making a custom, digital snowglobe (as implied by the title!) You'll be able to choose the background, particles, or even the music. Here's a live demo of what we're building.
The Basics
If you'd like to skip ahead to the fun part, or if you're short on time, you can use this template on replit to get started! Just hit the "use template" button at the top of the page and skip ahead to the "Make it look Fabulous" section (note: the particles.json file is already in place.) This template comes with the 'Make it Installable' customization already added as well.
Setting the Page Up
Every good project starts with a plan! Here, we'll link to some essential libraries and lay out the page. We'll be using basic HTML, intermediate CSS, and more advanced JavaScript, but it's really easy to figure out!
🦴 Add the Skeleton
While some skeletons are spooky-scary, these skeletons are actually really useful! A page skeleton is just the basic HTML that every website should have, such as a <!DOCTYPE>, <html> tags, and a <head>/<body>.
For more information on the basics of an HTML page, watch (LINK TO BE ADDED)
⛓ Linking Libraries
Now, to link the tsParticles library.
tsParticles is available as a single file from JSDeliver. Link to it using a <script> tag at https://cdn.jsdelivr.net/npm/tsparticles@2.11.0/tsparticles.bundle.min.js.
Lay it all Out
To lay out our page, we'll be using div's (inside of the <body> tag) which allow us to split the page into separate areas. They can be nested inside of each other and stylized with CSS. Let's make a snowglobe div with sections particles and ground...
...
<div id="snowglobe">
	<div id="particles">
	</div>
	<div id="ground">
	</div>
</div>
...
We'll leave these div's empty, but they'll serve an important role in laying out our page.
🖌 Make it look ✨ fabulous ✨
CSS is a language that allows us to style HTML pages! With it, we can resize elements, change fonts, mess with colors, and even animate things!
To start, let's reset all of the spacing!
* {
	padding: 0;
	margin: 0;
}
Next, we'll set up flex display on body. Make sure to set its flex-direction to column. Additionally, we'll make the body fill the whole viewport, set its background color (feel free to change this! this is the page background, not the snowglobe background), and make it center all the items with justify-content and align-items.
body {
	/* Set up flex display */
	display: flex;
	flex-direction: column;

	/* Fill the whole viewport */
	width: 100vw;
	height: 100vh;
	overflow: hidden; /* Hide all overflow */

	/* Center the items */
	justify-content: center;
	align-items: center;
}
Now, we'll set up the globe itself. First, we'll want to make the globe take up as much of the screen as possible. To do this, we'll use CSS's vmin unit to use the smallest screen dimension as a reference. To add some margin, we'll only want to take up around 85% of this space (so... 85vmin). Next, we'll set the background to a nice, balmy blue (#45b3e0, to be exact.) After that, we'll round off the snowglobe by setting border-radius to 100%. We'll hide the overflow in order to keep things within limits. Then, we'll set the margin to auto in order to make the globe flow nicely within its new home. Finally, we'll add a nice glow effect!
#snowglobe {
	/* Set the sizing*/
	width: 85vmin;
	height: 85vmin;

	/* Nice, but temporary, background */
	background: #45b3e0;

	/* Make the globe round */
	border-radius: 100%;
	overflow: hidden;

	/* Add some nice spacing */
	margin: auto;

	/* And finally, add a nice glow*/
	box-shadow: 0px 0px 20px 35px #FFFFFF05;
}
Adding the ground and particle settings are easy at this point... we'll have the ground take up just 25% of the snowglobe and leave the rest to the sky.
#particles {
  height: 75%;
  width: 100%;
}

#ground {
  height: 25%;
  width: 100%;
  background: #bebebe; /* You can change this now or later if you want */
}
Bonus: A shake animation!
If you want, we can add a fun little shake animation for whenever the snowglobe is activated! First, we'll add some springy keyframes. Then, we'll add a class called "shake" that we'll add to the snowglobe once it's activated.
@keyframes shake {
	0%,
	100% {
    transform: rotate(0deg);
	}

	25% {
    transform: rotate(15deg);
	}

	50% {
    transform: rotate(-15deg);
	}

	75% {
    transform: rotate(10deg);
	}
}

.shake {
  animation: shake 1s;
}
Script it up!
Now, after everything else is done, let's get the dirty work done!
First, we'll add another script tag after the snowglobe div. Inside, we'll start writing some javascript. Let's declare some variables real quick...
	// Select the globe
	let globe = document.getElementById("snowglobe");

	// Declare particles
	let particles;
Next, we'll add a function that will help us later on with activating the snowglobe when a device is shaken. This will accept an input event from the motion sensor on a device and calculate the magnitude with which the device was shaken. First, we'll grab the acceleration from the sensor. Then, we'll use a mathematical function that calculates the magnitude using those values. The function will finally return the result of that calculation.
	// Declare function for calculating Gyro activity
	function calculateAcceleration(event) {
		const {x, y, z} = event.accelerationIncludingGravity;
		const accelerationMagnitude = Math.sqrt(x * x + y * y + z * z);
		return accelerationMagnitude;
	}
Finally, we'll add the function to handle shaking activation!
	function shakeItUp() {
		particles.play();

		// Only include this code if you're making the shake animation
		globe.classList.add("shake")
		setTimeout(() => {globe.classList.remove("shake")}, 1100)
	}
↕ Choices, choices
Now, time to tie it all together! tsParticles can load particle configuration in a number of ways, but one of the easiest is to load it from a .json file. Go ahead and download this default snow configuration and place it in your website root as particles.json. You can customize these values later.
Under the calculateAcceleration() function, add the command tsParticles.load(), which allows us to load the configuration. This command takes two inputs, element ID and configuration. Our element ID is the ID of the element where we want the particles to appear, and our configuration is the path to our config file, particles.json.
tsParticles.loadJSON('particles', 'particles.json')
Next, we'll add a callback function. Inside we'll select the particles container and immediately pause the particles until they're shaken.
    tsParticles.loadJSON('particles', 'particles.json')
      .then(function () {
        // Select the particle container and pause the particles
        particles = tsParticles.domItem(0);
        particles.pause()
Then, we'll add an event listener that calls the shakeItUp() function whenever the snowglobe is clicked/touched.
        // Add globe event listener
        globe.addEventListener('click', () => {
          shakeItUp()
        });
Then, we'll add an event listener that calls the shakeItUp() function whenever the snowglobe is clicked/touched. Finally, we'll add an event listener to the window element (provided by default) that detects gyroscope shifts and calculates its magnitude. Finally, it will compare this magnitude to a threshold (in testing, values between 17-23 seemed to work best) which can be adjusted if needed. If this comparison passes, then it will call shakeItUp(). This is a lot at once, so take a look at the code below.
    tsParticles.loadJSON('particles', 'particles.json')
      .then(function () {
        // Select the particle container and pause the particles
        particles = tsParticles.domItem(0);
        particles.pause()

        // Add globe event listener
        globe.addEventListener('click', () => {
          shakeItUp()
        });

        // Add gyro event listener
        window.addEventListener("devicemotion", (event) => {
          // Calculate the magnitude every time
          const acceleration = calculateAcceleration(event);

          // Compare the magnitude to threshold.
          if (acceleration > 23) {
            shakeItUp()
          }
        });
      });
And, that's all!
Customization
At this point, you have a nice, amazing snowglobe. Congratulations 🎉 However, it's looking like all of these snowglobes are the same...
Let's fix that by spicing them up a bit!
Setting the Setting (Adding a background)
Adding an Image
Adding an image is super simple! If you don't have an image you'd like to use already, you can find one on a free service like Unsplash!

For example, this one.
Download the image and add it to the website folder (Err- upload it to your repl!) For simplicity, let's rename the file to background.jpg (or .png, etc.) Now, go into the CSS for the #snowglobe element. Let's change up that background...
#snowglobe {
	background: url('/background.jpg') center/cover;
}
Now, if you want to change up the position of the image within the globe, just change center in center/cover to another location such as right, top, or bottom.
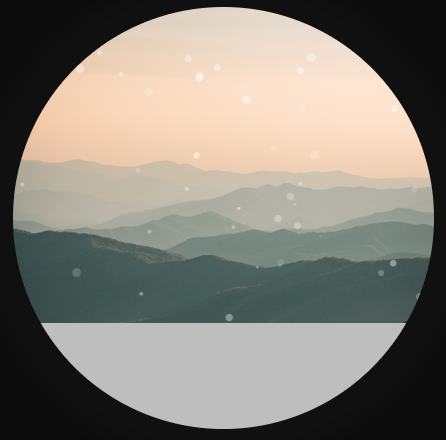
Hurrah, cool mountains!
Adding a Gradient
To keep it simple, you can use a tool like cssgradient.io to generate a cool gradient background. Once you're done, all you need to do is copy the part that starts with linear-gradient.
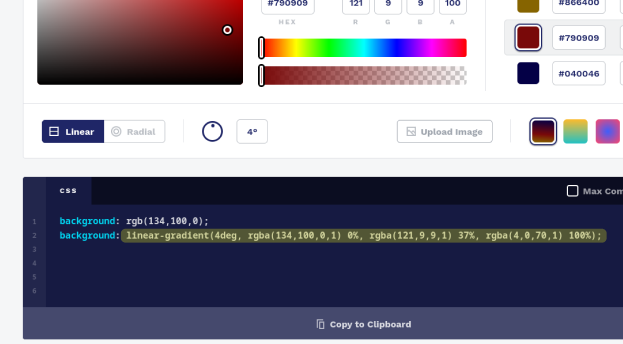
Just the highlighted part!
Next, go into the CSS for the #snowglobe element. Let's change up that background...
#snowglobe {
	/* You'll replace the gradient here with your own */
	background: linear-gradient(4deg, rgba(134, 100, 0, 1) 0%, rgba(121, 9, 9, 1) 32%, rgba(4, 0, 70, 1) 100%);
}
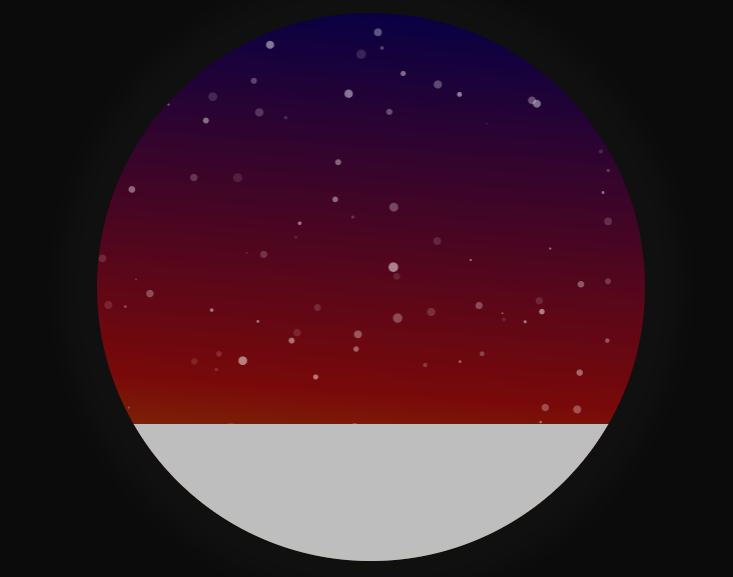
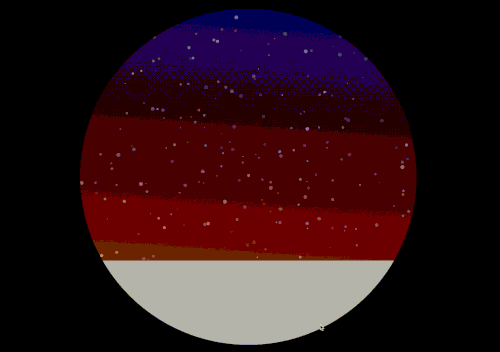
A cool sunset made with the gradient linear-gradient(4deg, rgba(134, 100, 0, 1) 0%, rgba(121, 9, 9, 1) 32%, rgba(4, 0, 70, 1) 100%)
If you want an extra cool challenge, try animating it! See [the section on animation above](#### Bonus: A shake animation!) and try to figure it out for yourself!
It's raining, It's pouring! (Change what's falling)
To change what's falling, we'll need to go into the particles.json file. Here, we can change animation, color, or even shape!
Change the Color
Changing the color is super easy! Just locate the colors object within particles. If you're using the default configuration, it should be near line 30. Change the value within this to whatever color you want and then you'll be good to go!
Change the Shape to a new Shape
By default, tsParticles allows you to use one of three different shapes: square, circle, and triangle. To change this, simply locate the particles.shape object within particles.json. If you're using the default config, this is located near line 129. Within this object, change the type to the shape you want. Ta-da! Now you have a new shape!
Make More Stuff Fall
tsParticles allows you to adjust a number value to make more or less particles fall. It uses a density calculator to scale this value up or down, too. This value in the default config is located near line 106, under the particles.number object. Change the value to whichever value you'd like.
Twinkle, Twinkle (Add some music)
First find some music! Legally, you should use some audio to which you have rights. Check the internet archive for something to use!
Anyway, you'll want to download that audio and add it to the website directory (or upload it to your repl.) For simplicity, rename the file to audio. Under the snowglobe div, go ahead and add a new audio element with a single source child.
<audio id="music">
	<!-- replace the src and type with your respective file extentions -->
	<source src="audio.ogg" type="audio/ogg"></source>
</audio>
Now, select the audio element. Then, add the line music.play(); into the shakeItUp() function.
let music = document.getElementById('music')
...
function shakeItUp() {
	...
	music.play()
}
Congratulations, now you have music!
It's an App! (Making it a PWA)
At this point, you have a cool snowglobe that's custom to you. Now, you can make it installable. Thankfully, you don't need to do much to create it as an installable app. You won't even need to have an App Store Developer account.
In order to do this, we'll use a web technology called a Progressive Web App (Or, PWA for short.) PWA uses a combination of smaller web technologies, like web manifests that declare your site and its content and service workers that allow your site to cache content and run in the background. All in all, it creates a neat little package for a web app.
To start, download these assets and unzip them into the root of your project. If you want, you can generate these assets with a custom icon and color scheme using a tool like Real Favicon Generator, my personal favourite. Now, add the following HTML to the end of your head:
  <!-- PWA Stuff -->
  <link rel="apple-touch-icon" sizes="180x180" href="/apple-touch-icon.png">
  <link rel="icon" type="image/png" sizes="32x32" href="/favicon-32x32.png">
  <link rel="icon" type="image/png" sizes="16x16" href="/favicon-16x16.png">
  <link rel="manifest" href="/manifest.json">
  <link rel="mask-icon" href="/safari-pinned-tab.svg" color="#3063ac">
  <meta name="apple-mobile-web-app-title" content="Snowglobe">
  <meta name="application-name" content="Snowglobe">
  <meta name="msapplication-TileColor" content="#2b5797">
  <meta name="theme-color" content="#2e2e2e">
Note: If you're using a custom pack, follow the instructions that they give instead.
Now, if all has gone well, you should be able to install the website as a PWA! Congratulations! If you need help with this, check out this article.
That's all, folks!
Congratulations! 🎉 🎉 🎉Share your final project with the community