Beginning the Foundation with Machine Learning
Part 1/4 | Prerequisite: a little web dev knowledge (HTML, JS, CSS) | 30-45 minutes
So what is artificial intelligence and machine learning? And what can you do with them?
(here's an example of what you'll create by the end of this jams. Your AI & ML model will be unique to you and serve a completely different purpose!)
We're going to be making an AI Companion or Smart Voice Assistant in your browser!
My companion is going to be Orpheus! You may have heard of her. Believe it or not you will be able to create this project by the end of this jams no matter how much background knowledge you have already! And your project will be entirely yours (take advantage of that creative freedom)!
Here are some ideas for your AI Companion:
- create an AI smart assistant that will constantly disagree with you and critique you
- create an AI relationship if you're quite lonely
- create an AI project manager that helps you schedule your day
- create an AI friend who you can have dinner with (again, if you're quite lonely)
- create an AI cooking companion who will walk you through steps while you're in the kitchen
- create an AI pet
- create an AI teacher who will give you lectures
This AI project will be completely web-based using HTML, JS, and CSS as well as tools such as Teachable Machine by Google and Replit. We'll also go over step-by-step instructions on how to incorporate OpenAI API into our project!
In this part, we'll start with an introduction into machine learning as well as our Teachable Machine model! By the end of today, you'll have made and trained your own ML model to recognize an audio or visual keyword.
Live Demo (Make sure to input your own API Key if you want it to work!) Sample Code(Make sure to input your own API Key if you want it to work!) Sample Teachable Model
Outline:
- Overview of Project (bird's eye view on the entire project)
- Get Started with Teachable Machine (train your own machine learning tool in your browser)
- Create Your Classes (decide what activates your AI companion)
- Train Your Model (add/create training data for your teachable machine
- Finish and Export!
- Enter The Code Editor (start coding in your browser)
- Onto the JS!
- Add Some Boilerplate HTML
Overview of Project
You may be familiar already with smart voice assistants such as Siri, Alexa, or Google Home. All these technologies utilize artificial intelligence to generate and complete messages.
You will be building a similar program. Call it, and it will turn on. It will turn your speech into text, and then input your transcript into a GPT model (through an API). The GPT model will then create a response which is turned into speech. The program will essentially talk back to you.
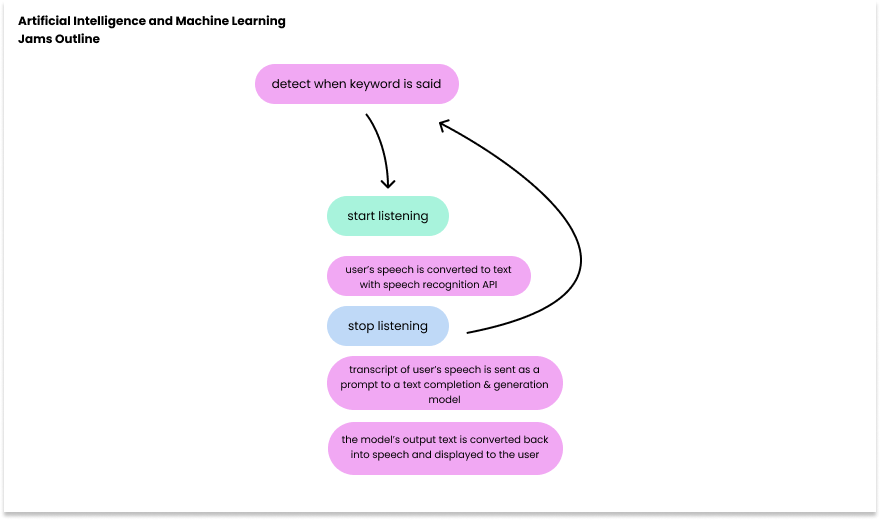
In this part, we'll be training the model to detect when the keyword is evoked with Teachable Machine.
Get Started with Teachable Machine!
We're going to be starting with teachable machine, a web-based tool that allows you to train your own machine learning model without any coding required.
We want to make sure that our AI Companion can recognize an audio or visual keyword! Just like a smart voice assistant:

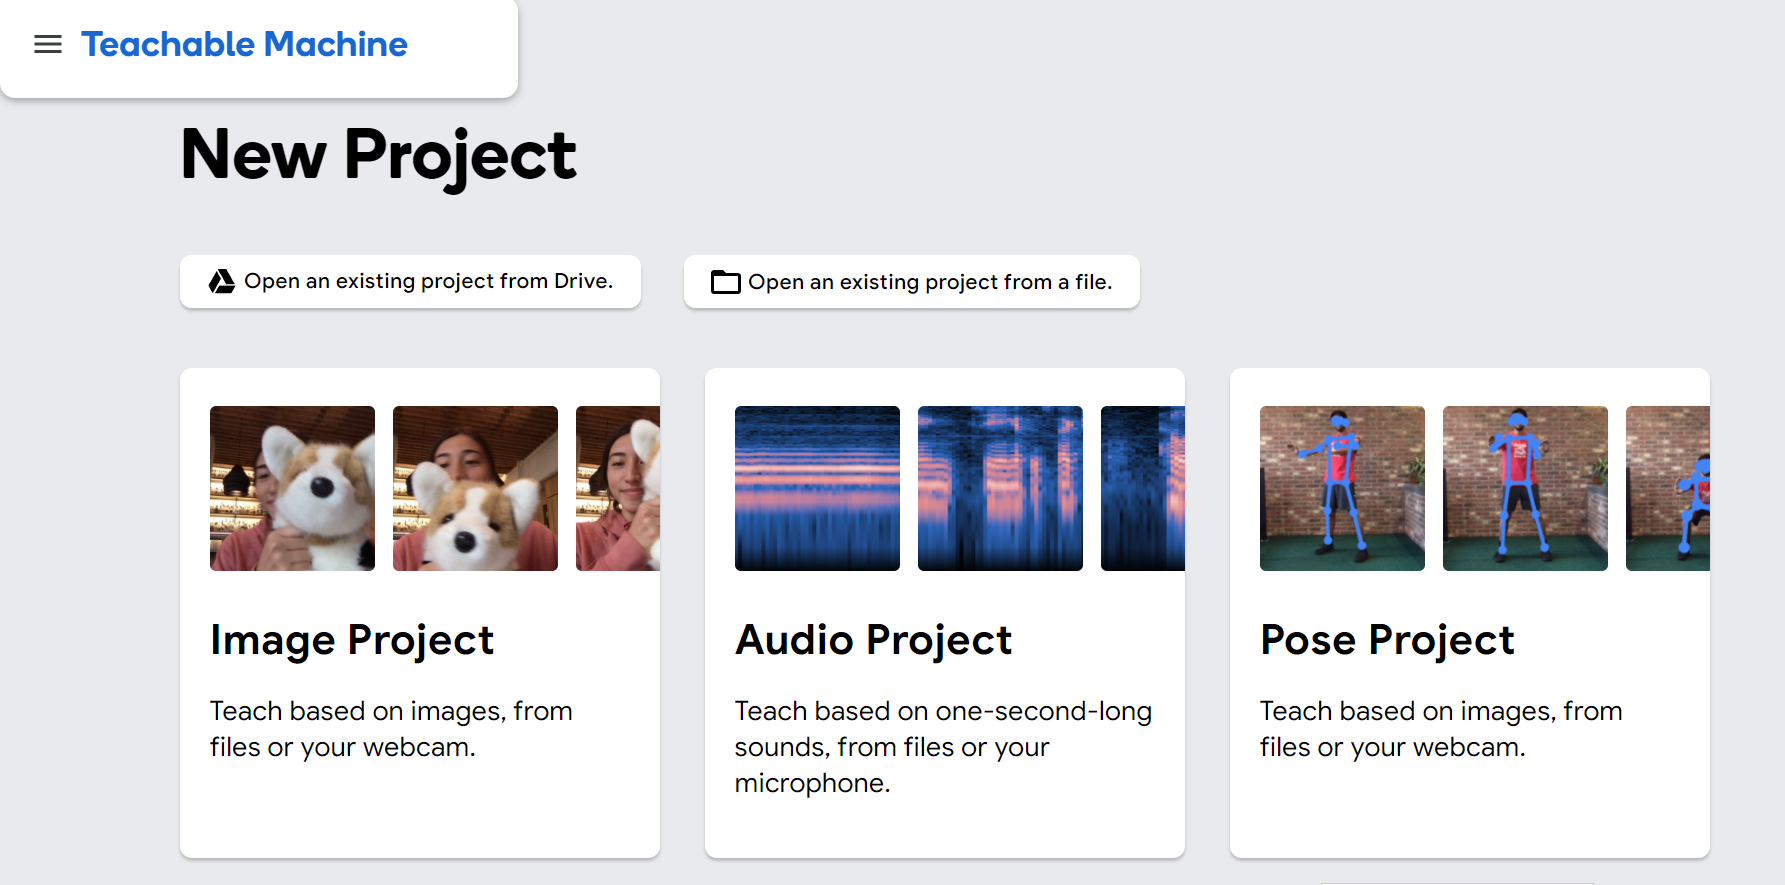
Head over to Teachable Machine and create a new project. I'm going to be creating an audio project! Keep in mind that you can use any of the three projects; your keyword could be a key-hand-motion or key-object that is held in front of the camera.
Anything that is obvious enough to be detected in order to prompt the AI Companion will work here!
Once you choose your project from the dashboard, you should see the different classes. Let's focus on what we want to train the model to learn/look out for first.
Create Your Classes
I want my AI Orpheus to respond to me whenever I say "Orpheus". Rename Class 2 to match your keyword, and don't copy mine! Your AI Companion should be completely your own.
It's almost as if you have two piles of stickers. Think of each sticker as a sample of training data.
You can add existing stickers (or samples) to the piles (or classes) to make it more clear what the characteristics of each class are.

Then the machine learning model can take and entirely new sample that you give it as input and use the data in the existing classes to sort it.
Train Your Model
Now it's time to train! If you're doing an image or pose model click on "Webcam" and then hold to take a burst of photos. If you're doing an audio project, click the "Mic" button to record short clips of your keyword being said.
Tip: the best training data set has multiple variations of the same sample in different settings.
The minimum number of samples based on the project type is listed. But remember more data = better accuracy of model.
If I had even more stickers in the piles it would be even easier to sort new stickers that I got because there would be more data to evaluate from!
Now record and extract sample data
Also make sure to record lots of silence and background noise as well in different settings (in a classroom, hallway, outside, alone, etc) so the model is good at detecting when nothing is being said. We want there to be a clear distinction between when the keyword is said vs. when it is not said.
Finish and Export
And tada! Once you're done click the "Train Model" button. Now you have a fully working machine learning model.
And you don't have to stop there: try creating another class that'll make it easier to differentiate what is or isn't the keyword even further.
For example, I know the word "amorphous" sort of sounds like Orpheus, but isn't exactly the keyword. Currently, the model still gets a little confused and assumes that someone saying "amorphous" is partially saying Orpheus.
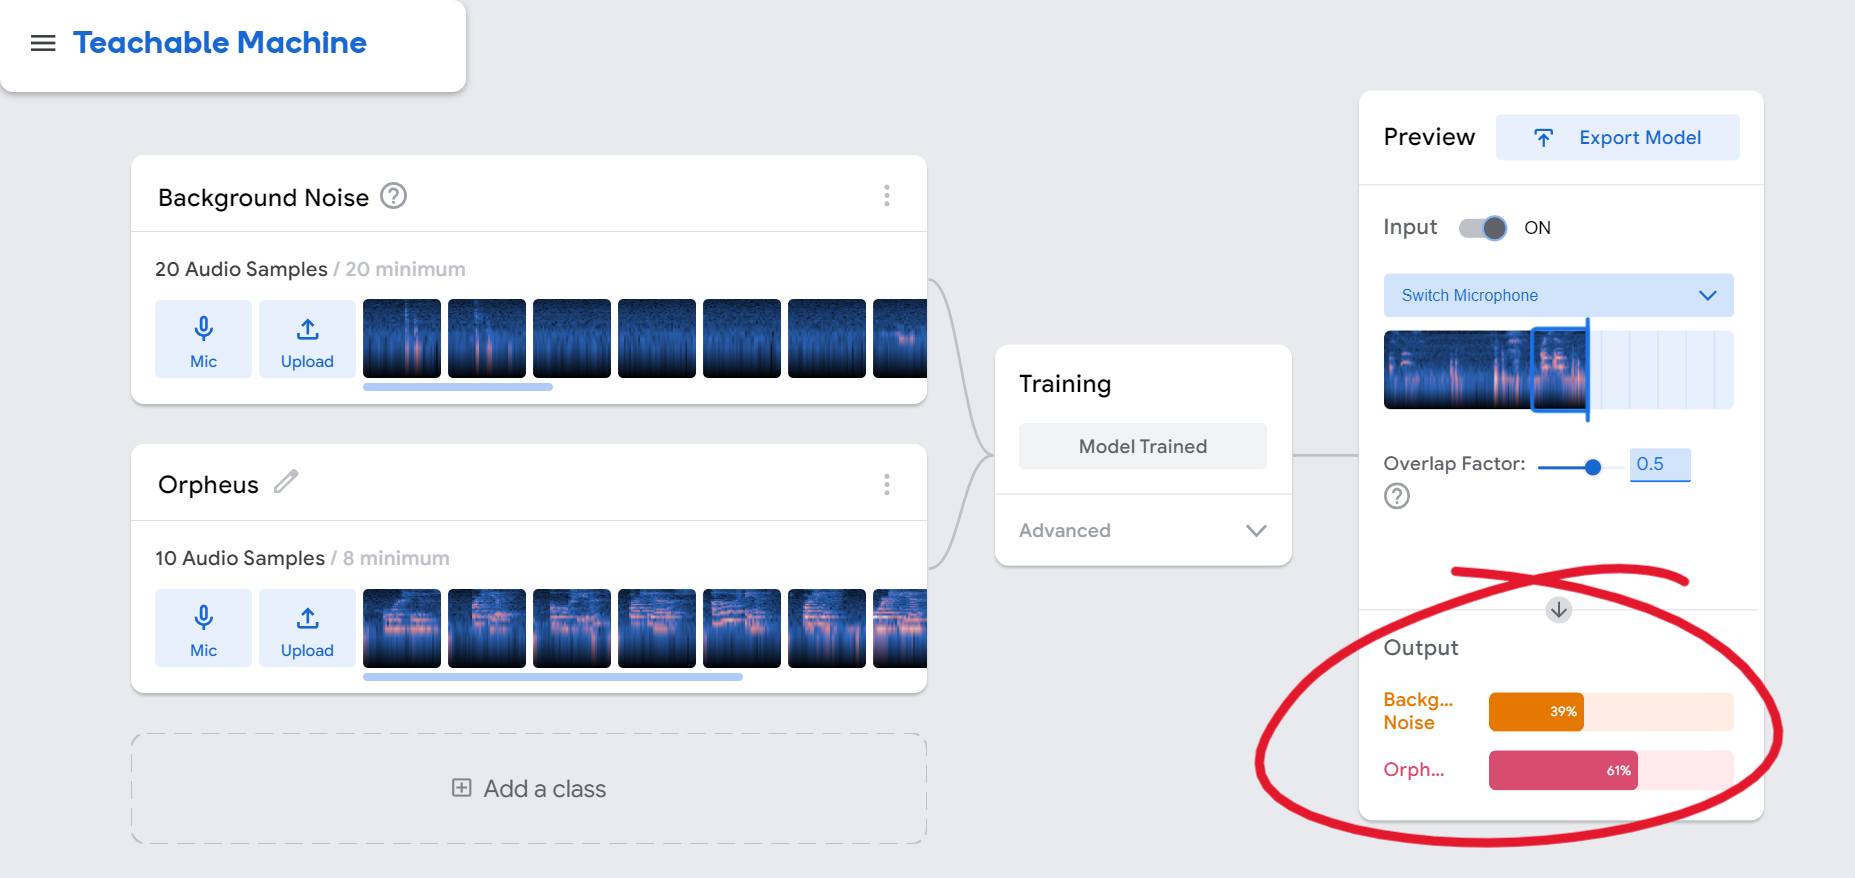
I'm going to make a separate class for the word "amorphous" so it no longer confuses the model.
Back to our sticker and basket analogy, this is just me creating another basket so people aren't confused on where to put stickers when sorting them.
Look at the image below. Now the model is less confused when I say the similar-sounding-but-not-actually-the-keyword word.

You've essentially created another pile!
Click the Export Model Button
Once you're here you should see an "Update my cloud model" button. Make sure you do this!
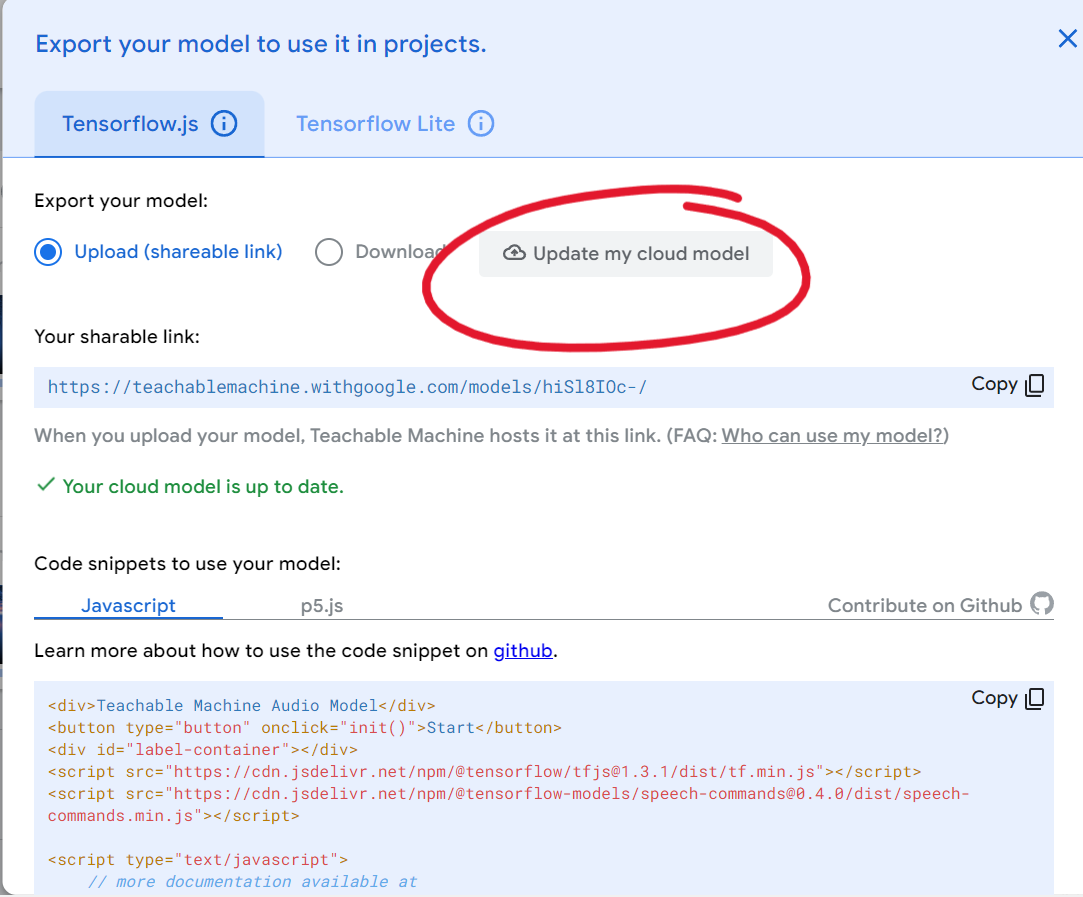
Now you can show off your work by sending people the shareable link.
To finish our model we'll copy the shareable link as well as the tensorflow.js JavaScript that's given below.
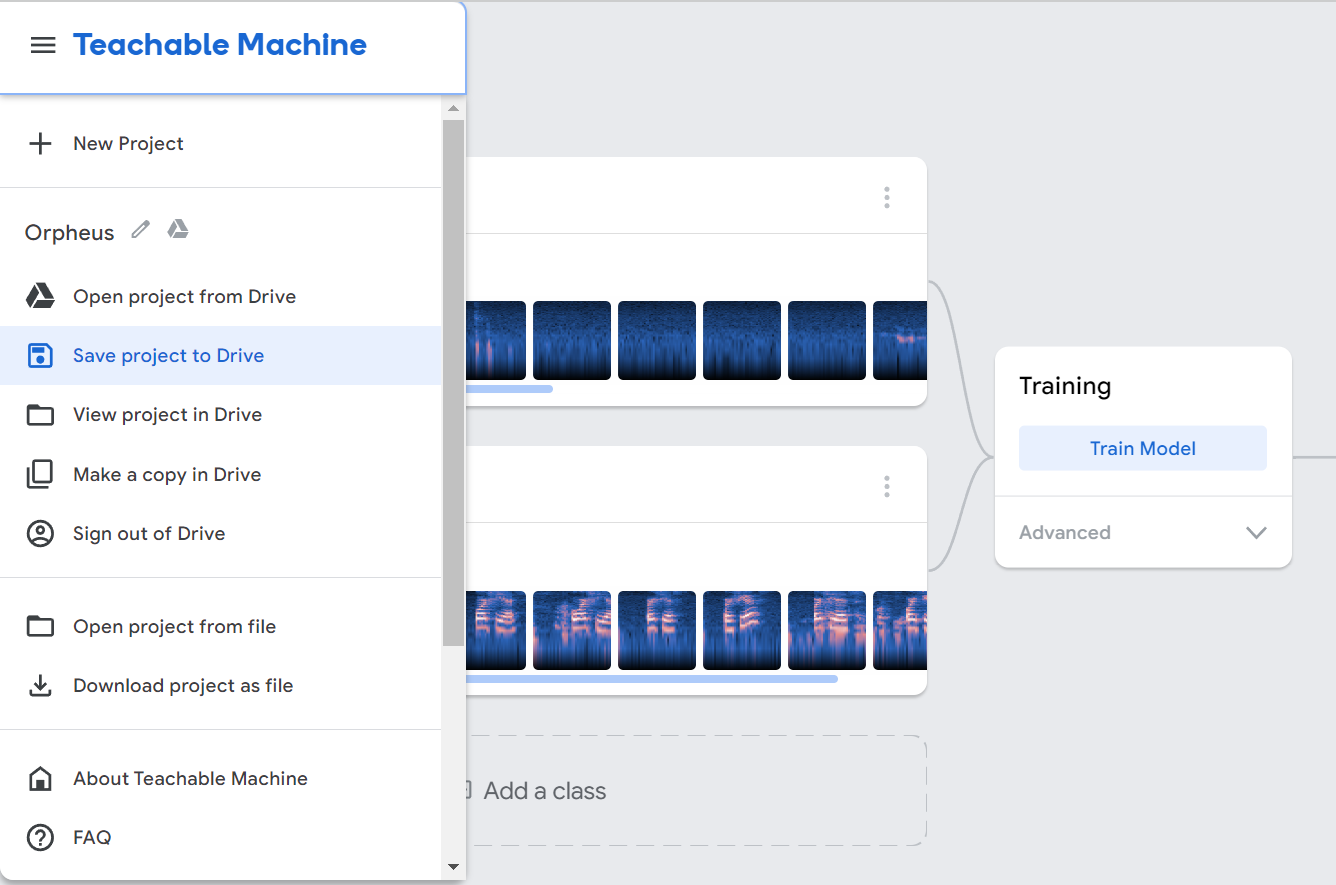
Make sure to save your teachable machine to drive so it can be accessed later. Next time, instead of creating a new project, you can open this existing project from drive.
Great! Now you've finished with the teachable machine. You've trained a machine learning model with a dataset to understand and recognize when it's being called to "turn on".
Now let's implement the model into a program so you can interact with it.
Enter the Code Editor
Firstly, let's get setup in the code editor! Head over to the Replit Website and create an account.
If you're having difficulty using the site try https://firewalledreplit.com/ or even an alternative like Glitch
Create a New Replit Project
Welcome to your Replit Dashboard. Once inside, tap "+ Creat a Repl" and then select the HTML, CSS, and JavaScript template.

You should now have three files. Rename them to be: index.html, script.js, and style.css respectively.
Onto the JS!
Let's skip the HTML/CSS for now. We'll head straight over to script.js or the JavaScript file and add this initial code:
const URL = 'INSERT TEACHABLE MACHINE URL HERE'
const THRESHOLD = 0.9
Yay! We've just created the following two constants:
URLrepresents the URL of the Teachable Machine model we will be usingTHRESHOLDrepresents the confidence threshold for recognizing a specific word
 (Feel free to set the threshold number to any amount you like! I've got it set for 90% or higher accuracy in recognition. This is essentially that output bar you see moving in the teachable machine).
Now we are going to create one big function that all the other functions + our teachable machine code will sit inside. It's an event handler that runs once the window is finished loading to ensure that the code inside only runs after all the HTML content has been loaded:
window.onload = () => {
  let recognizer;
}
This is where we will add pieces of the Tensorflow.js file that we got after exporting the teachable machine model.
We should also go ahead and declare the recognizer variable (this pops up later).
let recognizer;
Now we're going to create a createModel() function that's responsible for loading the Teachable Machine model. It creates a new instance of the speechCommands object and uses the provided URL to set the model topology and metadata URLs. It then calls the ensureModelLoaded() function to ensure that the model and metadata are loaded via HTTPS requests.
async function createModel() {
  const checkpointURL = URL + 'model.json'
  const metadataURL = URL + 'metadata.json'

  const recognizer = speechCommands.create(
    'BROWSER_FFT',
    undefined,
    checkpointURL,
    metadataURL
  )

  await recognizer.ensureModelLoaded()
  return recognizer
}
Tip: If you're ever stuck or confused or have a spelling mistake in your code that your IDE isn't catching but continues to break the whole program, try asking AI such as ChatGPT to figure it out for you!
And next, we can create the init() function for initializing the speech recognition process. It awaits the createModel() function to load the model and assigns it to the recognizer variable. Then, it calls the listen() function on the recognizer object.
async function init() {
  recognizer = await createModel()
}
The listen() function will reside in the init() function and takes two arguments. The first argument is a callback function that is invoked when a word is recognized. In this case, it checks the score of the recognized word at index 1 (index 1 corresponds to the trigger word in the Teachable Machine model) and compares it with the THRESHOLD value. If the score is higher than the threshold, it logs "Hey" to the console.
The second argument is a configuration object that allows you to customize the behavior of the speech recognition. It includes options such as
includeSpectrogram: determines whether thelisten()function should return the spectrogram (a visual representation of the frequencies present in an audio signal over time) data along with the recognition result.probabilityThreshold: the accuracy threshold or minimum confidence score that a recognized word must have to be considered a valid recognition. You can adjust this value to have a higher threshold (stricter recognition) or a lower threshold (more lenient) based on your requirements.invokeCallbackOnNoiseAndUnknown: determines whether the callback function should be invoked when the recognized word is considered noise or unknown. When set totrue, the callback function will be triggered even when the recognized word is not part of the trained vocabulary or if it is classified as noise.overlapFactor: value between 0 (no overlap) and 1 (complete overlap) that controls the amount of overlap between consecutive analysis frames during the recognition process. Higher overlap values can provide better accuracy but might introduce a slight delay in processing.
async function init() {
recognizer = await createModel()

recognizer.listen(
    result => {
      const orpheusNoise = result.scores[1]
      if (orpheusNoise > THRESHOLD) {
        console.log("Hey")
      }
    },
    {
      includeSpectrogram: true,
      probabilityThreshold: 0.75,
      invokeCallbackOnNoiseAndUnknown: true,
      overlapFactor: 0.5
    }
)}
(These are just what I put as the options, but feel free to mess around with them! I also suggest that you keep the overlapFactor between 0.5 and 0.75 for best accuracy & speed!)
Note that the code inside the init() function is not executed immediately but is defined to be executed later when the window finishes loading.
Full code:
const URL = 'INSERT TEACHABLE MACHINE URL HERE'
const THRESHOLD = 0.9

window.onload = () => {
  //copy and paste our Teachable Machine model here!
  let recognizer;

  async function createModel() {
    const checkpointURL = URL + 'model.json'
    const metadataURL = URL + 'metadata.json'

    const recognizer = speechCommands.create(
      'BROWSER_FFT',
      undefined,
      checkpointURL,
      metadataURL
    )

    await recognizer.ensureModelLoaded()

    return recognizer
  }

  async function init() {
    recognizer = await createModel()

    recognizer.listen(
      result => {
        const orpheusNoise = result.scores[1]
        if (orpheusNoise > THRESHOLD) {
          console.log("Hey")
        }
      },
      {
        includeSpectrogram: true,
        probabilityThreshold: 0.75,
        invokeCallbackOnNoiseAndUnknown: true,
        overlapFactor: 0.5
      }
    )
  }
}
Take a minute and look back at the Tensorflow.js code that you had the option of copying a few steps ago when you exported the Teachable machine. Can you tell where each function that you wrote ✨all by yourself✨ came from?
All this code above has come directly from the teachable machine Tensorflow.js file!
Add Some Boilerplate HTML
Open the index.html file! Replit will give you some template code already, but replace that with my template code because it's better.
<!DOCTYPE html>
<html lang="en">
  <head>
    <meta charset="utf-8" />
    <meta name="viewport" content="width=device-width, initial-scale=1.0" />
    <meta http-equiv="X-UA-Compatible" content="ie=edge" />
    <title>Orpheus</title>
    <link rel="stylesheet" href="/styles.css" />
  </head>
  <body>
    <div>
      <div>
        <script src="/script.js"></script>
      </div>
    </div>
  </body>
</html>
You should notice that everything here is about standard, and that the three files (HTML, JS, and CSS) are now connected to each other.
But there's one last step we need to complete in order to incorporate the Teachable Machine model. Add the following code to the <head>:
<script src="https://cdn.jsdelivr.net/npm/@tensorflow/tfjs@1.3.1/dist/tf.min.js"></script>
<script src="https://cdn.jsdelivr.net/npm/@tensorflow-models/speech-commands@0.5.4/dist/speech-commands.min.js"></script>
Great! Now Run Your Program
Now on Replit open up your HTML "site" in a new tab. don't worry if it's blank! It's supposed to be since we don't have many elements on it.
Now click ctrl+shift+i to open the inspect element and move to the console tab. If you look under choices you'll be able to see the text that has come back!
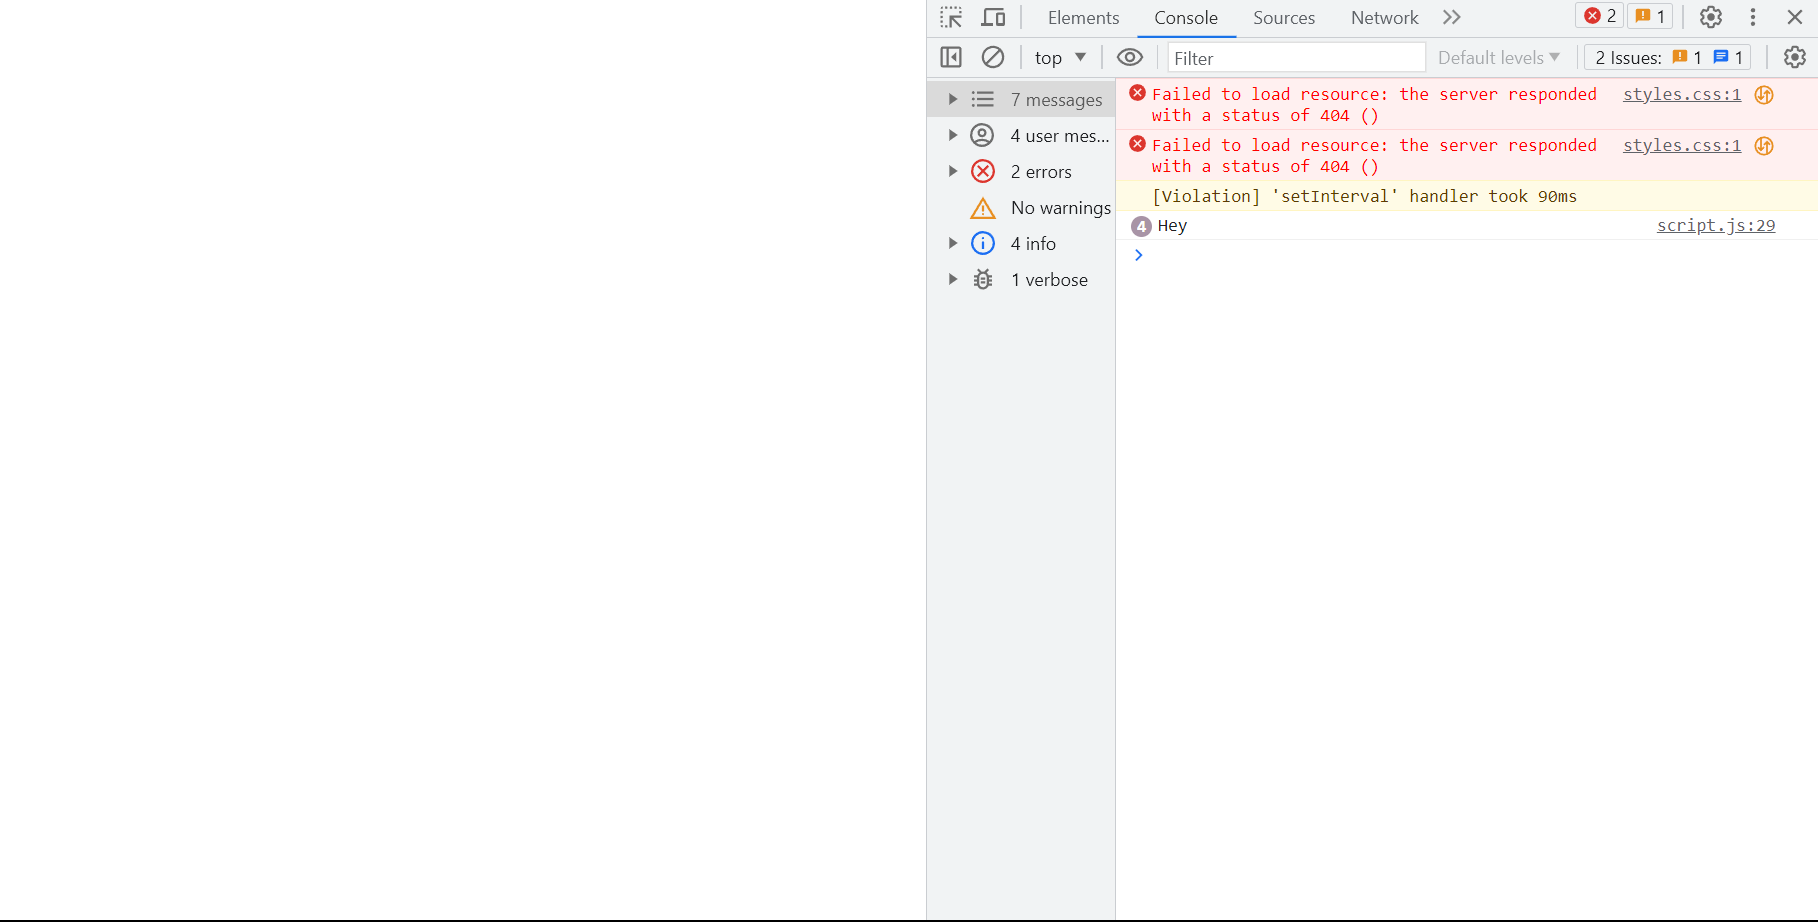
Yay! Now watch the console print "Hey" every time you say the keyword!
Additional Challenge Hacking! (recommended)
The creation doesn't have to stop here! Here are some Jam Hacks™ that you can experiment with:

- I've made the keyword an audio one but what if we tried using a visual/image model instead? (My friend Thomas is testing to see what would happen if the teachable machine was trained to notice if you raised your hand or waved a flag!)
- What would happen if you added multiple keywords?
- Try someone else's teachable machine model! Do you think you could confuse it.
- I know I said I'd recommend the
overlapFactorbetween 0.5 and 0.75 for best accuracy & speed, but in what scenario would having a slower and more accurate model be more appropriate? And vice versa
And again, the best model is one that is trained with a lot of data! Always use diverse variations.
Stay Tuned To Build Your Very Own Smart Voice Assistant
Okay, now that we've spent time to train our model to recognize when to listen let's implement it into a program that controls how it listens and what it will do with that information.
Also, printing in the console is boring, let's make it talk back to us out loud!
In the next part we will build the foundation of our AI companion by implementing a speech to text recognition API.
Congratulations! 🎉 🎉 🎉If you're a highschooler who enjoys programming or tinkering with hardware, make sure to join Hack Club, the world's largest nonprofit empowering teenagers to make cool projects! There's tons of programs where you can get prizes for programming, get your hardware projects fully funded and you can join the awesome community of 100k+ teenagers who love making cool stuff (just like you!).