Giving Your Smart AI Companion a Body and Brain!
Part 4/4 | Prerequisite: a little web dev knowledge (HTML, JS, CSS) | 45-60 minutes
Let's RECAP
In the first part of the Jams, we used Teachable machine to train a model in order to recognize the keyword "Orpheus". We then used the Replit online IDE to create an empty site that would print a message in the console every time the keyword was detected to be said.

In the second part of the Jams, we gave Orpheus a voice! Now instead of printing out a message in the console, our AI Companion would speak and say it out loud.
In the third part of the Jams, we gave Orpheus the power to convert our speech into text.
Now, in the fourth and final part, we will finally incorporate the OpenAI API to utilize the GPT 3.5 model. Ever heard of ChatGPT? OpenAI built it and invested years and billions of dollars to create the dataset that you will be using for your AI Companion.
Outline:
- Set-Up and Get Your API Key (quick intro into APIs)
- Idea Generation (set up idea generation with the OpenAI API)
- Now Text Completion! (set up text completion with the OpenAI API)
- Final Function
Set-Up and Get Your API Key:
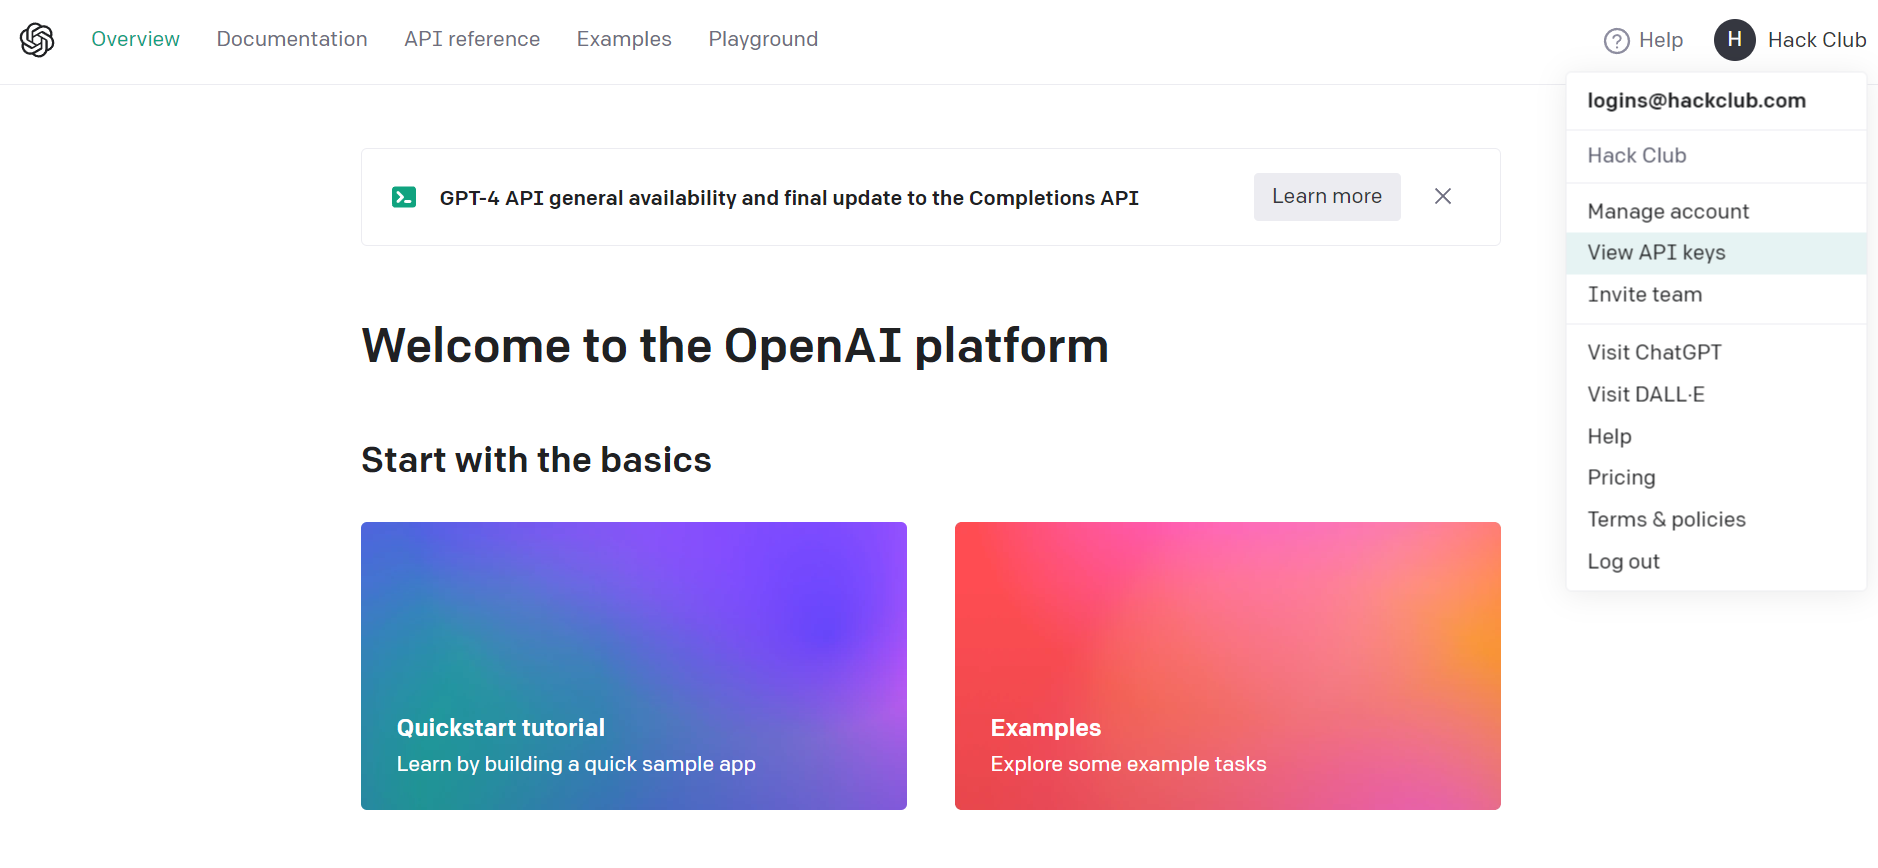
- Make an account and login to https://platform.openai.com/
- Go to API keys and create a new API key. Make sure to save it! never share it! As you can see in the demo, we haven't provided our own API key in the project for this reason.
We will be using GPT-3.5 or GPT-4, the most accessible and recently updated set of models that can understand & generate both natural language and code. There are also models such as Whisper (that can convert audio into text) or Dall-e (that can generate and edit images based on a prompt).
There's Two Parts to Implementing a Text Model
Firstly, the AI needs to be able to generate its own ideas. Next, the AI must complete text suggestions, such as how Google tries to guess what you're searching.

This will allow us to have a conversation with the AI!
Idea Generation
- Use this endpoint:
POST https://api.openai.com/v1/completions
APIs are really simple! there's 4 main requests for HTTP request methods:
APIs (or Application Programming Interfaces) are like a digital restaurant, they are the waiter that goes between you (the client) and the kitchen (the server). Requests are sent from you the client to the server to perform actions.

| Method | Description |
|---|---|
| GET | Retrieve information |
| POST | Send information |
| PUT/PATCH | Update information |
| DELETE | Delete information |
- Here we are fetching the API and using the post method to send information:
fetch("https://api.openai.com/v1/completions", {
	method: "POST",
	headers: {
	Authorization: `Bearer ${API_KEY}`,
	"Content-Type": "application/json"
	},
	body: JSON.stringify()
})
- Let's add what model we're using (this is the only not optional step)! remember you can find a list of all models here, but only some can be used for text completion and generation.
fetch("https://api.openai.com/v1/completions", {
	method: "POST",
	headers: {
	Authorization: `Bearer ${API_KEY}`,
	"Content-Type": "application/json"
	},
	body: JSON.stringify({
		model: "gpt-3.5-turbo"
	})
})
- Next let's put in a prompt. this will be a string that will be sent to the API to generate text for
fetch("https://api.openai.com/v1/completions", {
	method: "POST",
	headers: {
	Authorization: `Bearer ${API_KEY}`,
	"Content-Type": "application/json"
	},
	body: JSON.stringify({
		model: "gpt-3.5-turbo",
		prompt: "hi! how are you?"
	})
})
- Next we'll add
max_tokensto take an integer value for the largest value of tokens to generate in the completion.
fetch("https://api.openai.com/v1/completions", {
	method: "POST",
	headers: {
	Authorization: `Bearer ${API_KEY}`,
	"Content-Type": "application/json"
	},
	body: JSON.stringify({
		model: "gpt-3.5-turbo",
		prompt: "what should i do today?",
		max_tokens: 6
	})
})
Tokens are common sequences of characters found in text and what the models use to process it.
The OpenAI tokenizer (https://platform.openai.com/tokenizer) can be used to visually demonstrate how an API would tokenize a string of text, as well as how many tokens it would be.
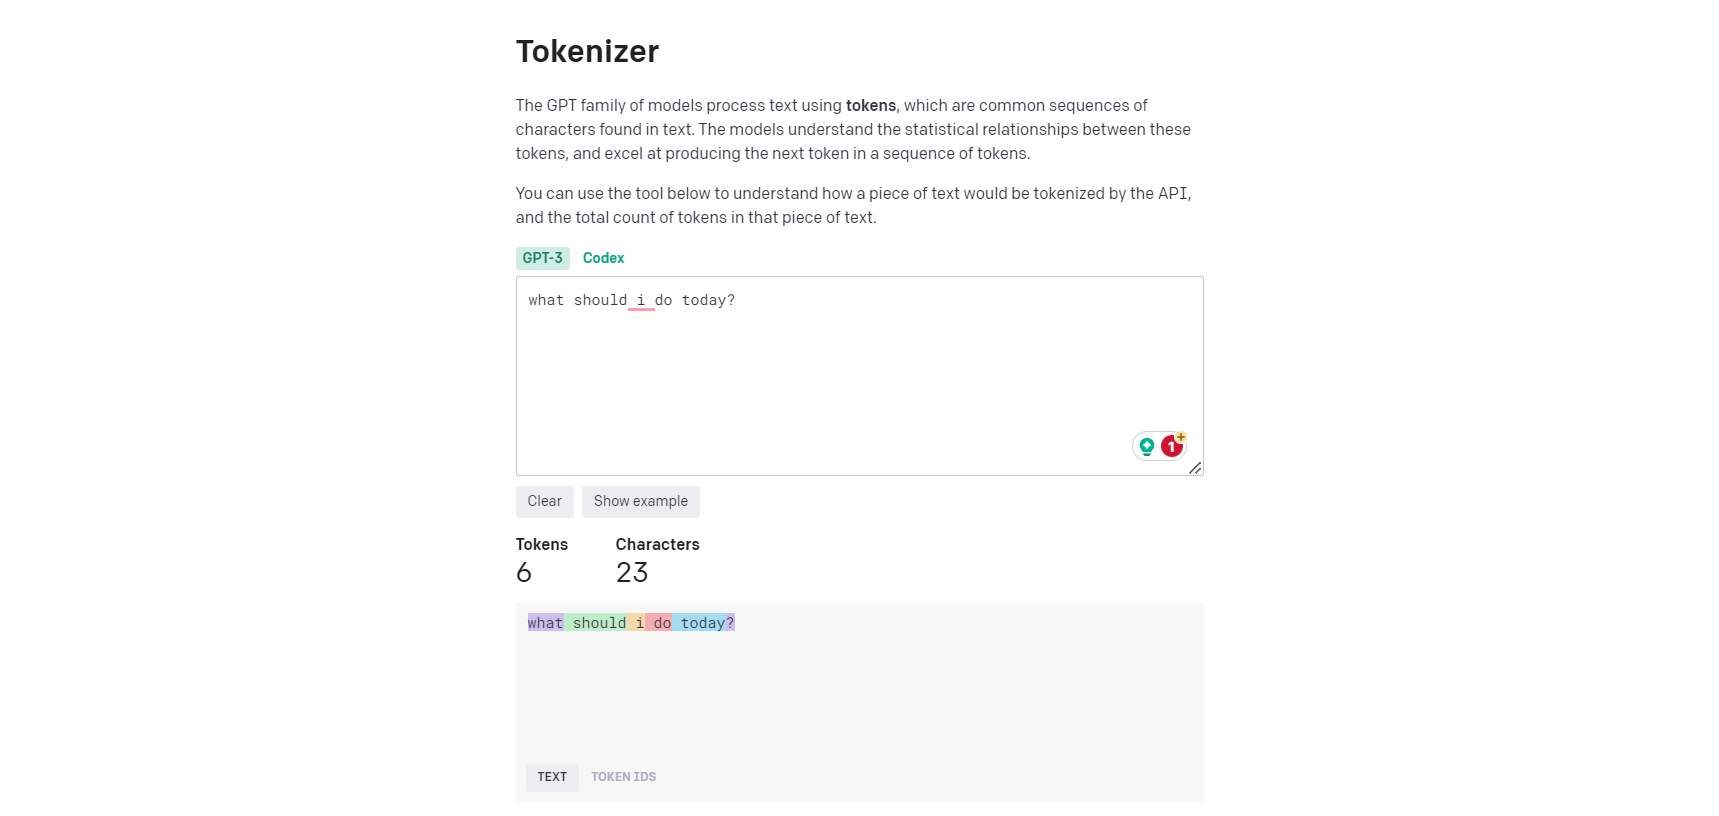
General rule: 1 token generally corresponds to ~4 characters of text for common English text or 3/4 of a word. this is roughly 100 tokens ~= 75 words.
- Here are a few more options that you can use! pick and choose from the following to see what they can do:
| Name | Description | Restrictions |
|---|---|---|
| temperature | this is a value from zero to two, where higher values will make the output more random, and lower values will make the output more focused and deterministic. | cannot be used with top_p |
| top_p | nucleus sample: where the model only considers the tokens with the top_p probability mass | cannot be used with temperature |
| n | allows us to assert how many completions are generated for each prompt | doing this will take more tokens, so be mindful |
| user | will represent end-user to help openai detect/monitor abuse | |
| Check out OpenAI API Documentation for more options that you can use! |
Now Let's Add Some Code!
Tip: If you feel like you ever need help or someone to double-check your work during any part of the following process, feel free to "pair-program" with ChatGPT! Just copy and paste your code and question into the box and read the AI's reply.
Go to our script.js file and make a new function called answer to insert our fetch request in!
async function answer(message) {
	return new Promise((resolve, reject) => {

	}
}
Let's create a function called fetchData and make is async.
async function fetchData(){

}
Now inside the brackets type const response = await fetch() to save the fetched data in the constant variable response. Go to the documentation and get that URL that is stated and put it in the fetch().
Your code should now look like this. This goes to the completions endpoint.
async function fetchData(){
	const response = await fetch("https://api.openai.com/v1/completions")
}
- Next we're going to pass through all our options that we were looking at before. so in the curly brackets let's pass through the method (a post method) as well as some headers.
async function fetchData(){
	const response = await fetch("https://api.openai.com/v1/completions",{
		method: "POST",
		headers:{

		}
	})
}
But what goes in headers? For starters our API key needs to be passed through, and for that we'll use authorization.
Back at the beginning of the code, let's create another constant to store that string of letters and numbers that you retrieved from openai earlier:
const API_KEY = "insert your private API KEY here"
And in the headers brackets add this line:
Authorization: 'Bearer' ${API_KEY},
- Now let's also define our content type in the brackets and we're going to be working with json.
"Content-Type: "application/json"
You should now have this:
const API_KEY = "insert your private API KEY here"
async function fetchData(){
	const response = await fetch("https://api.openai.com/v1/completions", {
	method: "POST",
	headers: {
      Authorization: `Bearer ${API_KEY}`,
      "Content-Type": "application/json"
    },

	})
}
- We're going to have to pass through the options that we saw after the headers. We're using json to pass the text and "text-davinci-003" as the model for now (we will change this to gpt-3.5 or gpt-4 later).
body: JSON.stringify({
      model: "text-davinci-003",
      prompt: "what should i do today?",
      max_token: 6
    })
- And now finally, we are going to get the response as json, but since it's also an async method we have to use await and save it in a variable. and of course, let's use
alertto display the data as an alert on screen.
const data = await response.json()
alert(data)
Check your code!
const API_KEY = "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"
async function fetchData() {
  const response = await fetch("https://api.openai.com/v1/completions", {
    method: "POST",
    headers: {
      Authorization: `Bearer ${API_KEY}`,
      "Content-Type": "application/json"
    },
    body: JSON.stringify({
      model: "text-davinci-003",
      prompt: "what should i do today?",
      max_token: 6
    })
  })
  const data = await response.json()
  alert(data)
}
But there's one last important step: call your function, silly!
fetchData()
Now Text Completion
Let's use this knowledge to build an AI that also supports text completion. This will allow us to have full conversations with the AI.
I'll be using gpt-3.5 as my model this time.
And our new endpoint will be POST https://api.openai.com/v1/chat/completions (note: /chat for chat completions)
- Make sure all the required things are added into the script.js file (from the last section):
- the API key which you must retrieve and save in an variable
- the content type
- and the model (all models here: https://platform.openai.com/docs/models)
const API_KEY = "insert your private API key here"
async function fetchData() {
  const response = await fetch("https://api.openai.com/v1/chat/completions", {
    method: "POST",
    headers: {
      Authorization: `Bearer ${API_KEY}`,
      "Content-Type": "application/json"
    },
    body: JSON.stringify({
      model: "gpt-3.5-turbo",
    })
  })
}
- An additional requirement this time is to include
messages. messages are a list of messages comprising the conversation so far. Example Python code
messages:[{
        role: "user",
        content:"Hello!"
      }]
- Now let's put that data somewhere and call the function you just made.
const data = await response.json()
console.log(data)
Full code:
const API_KEY = "insert your private API key here"
async function fetchData() {
  const response = await fetch("https://api.openai.com/v1/chat/completions", {
    method: "POST",
    headers: {
      Authorization: `Bearer ${API_KEY}`,
      "Content-Type": "application/json"
    },
    body: JSON.stringify({
      model: "gpt-3.5-turbo",
      messages:[{
        role: "user",
        content:"Hello!"
      }]
    })
  })
  const data = await response.json()
  console.log(data)
}

fetchData()
Final Function
Okay, great, but we need to use the function. The first thing we'll do is create one last function (I promise!) called process so our code doesn't get too messy:
async function process() {
  document.getElementById('result').style.display = 'block'

  hear().then(result => {
    document.getElementById('result').style.display = 'none'

    let message = { role: 'user', content: result }
    addMessage(message)
    document.getElementById('loading').style.display = 'block'

    answer(message).then(response => {
      response.role = 'system'

      messages.push(response)
      addMessage(response)

      document.getElementById('loading').style.display = 'none'

      speak(response.content).then(() => {
        process()
      })
    })
  })
}
So this is mostly the code that was in our recognizer.listen function. Except we added a couple parts. First up, we are now using answer to respond to the message.
Once we have an answer, we use addMessage to add it to the screen, and then use speak so Orpheus can speak it out loud.
After Orpheus is done speaking, we can repeat the process, so the computer will keep listening to us.
And finally, let's replace recognizer.listen now:
recognizer.listen(
  result => {
    const orpheusNoise = result.scores[1]
    if (orpheusNoise > THRESHOLD && !listening) {
      listening = true
      speak('Hey!').then(() => {
        process()
      })
    }
  },
  {
    includeSpectrogram: true,
    probabilityThreshold: 0.75,
    invokeCallbackOnNoiseAndUnknown: true,
    overlapFactor: 0.5
  }
)
Woah, now it works! Talk to Orpheus.
Final Demo
We went further and customized ours to look like a phone, but I encourage you to go out and create your own styling :
@import url('https://fonts.googleapis.com/css2?family=Roboto&display=swap');

* {
  box-sizing: border-box;
}

body,
html {
  background-color: #fafafa;
  font-family: -apple-system, 'Roboto', sans-serif;
  margin: 0;
  padding: 2rem 0;
  display: flex;
  align-items: center;
  justify-content: center;
}

#phone {
  aspect-ratio: 1 / 2;
  box-shadow: 0 8px 16px 0 rgba(0, 0, 0, 0.4);
  width: 375px;
  border: 14px solid black;
  border-radius: 28px;
}

#container {
  position: relative;
  background-color: white;
  width: 100%;
  height: 100%;
  border-radius: 14px;
  border: 1px solid white;
  overflow-y: auto;
}

#header {
  background-color: rgba(255, 255, 255, 0.5);
  -webkit-backdrop-filter: blur(2em);
  backdrop-filter: blur(2em);
  position: sticky;
  top: 0;
  border-bottom: 1px solid #e5e5e5;
  text-align: center;
  padding-top: 0.5rem;
}

#header img {
  width: 80px;
}

#header p {
  margin-top: -10px;
}

#wrapper {
  display: flex;
  flex-direction: column;
  padding: 1rem 0.5rem;
}

#messages {
  display: flex;
  flex-direction: column;
}

.user {
  background-color: #09f;
  color: white;
  padding: 7px 14px;
  border-radius: 14px;
  align-self: flex-end;
  margin-bottom: 7px;
}

.system {
  background-color: #eee;
  padding: 7px 14px;
  border-radius: 14px;
  margin-bottom: 7px;
  align-self: flex-start;
}

#result,
#loading {
  display: none;
}
Final Demo
Additional Challenge Hacking! (recommended)
It's that time you've all been waiting for! Let's Hack our Jam! Try doing one of the following:

Use any one of the APIs in your own project. Here are some examples:
- DIY transcript app by connecting YouTube videos to SpeechRecognition API!
- Train Teachable Machine to do other things! JC has a guitar so she was thinking of recognizing chords to make her own Guitar Hero
- What if you had a password to unlock your assistant? Train Teachable Machine to recognize you drawing digits in the air to unlock your assistant!
- Redesign the UI! Ours is a phone but maybe yours is Jarvis
- Add messages to
localStorageso your AI can remember what it asked you last time!
Congratulations!
You've created a project with artificial intelligence and machine learning. Now go forth and be hacky!

Congratulations! 🎉 🎉 🎉If you're a highschooler who enjoys programming or tinkering with hardware, make sure to join Hack Club, the world's largest nonprofit empowering teenagers to make cool projects! There's tons of programs where you can get prizes for programming, get your hardware projects fully funded and you can join the awesome community of 100k+ teenagers who love making cool stuff (just like you!).