Presentation
Video
Add in User Input and Customization
Part 4: 30-45 min
Table of Contents
Let’s do a quick rundown on what we’re gonna do in this section. We are going to:
- Creating a slider for changing color
- Challenge = gradient
- Creating a slider for changing volume and amplitude
- Write a list of things to fiddle with... :3
Section 1: Let’s make a RAVE
Ok, we’re not really gonna make a rave. But we are gonna add some color today! One requirement of your Oscillart project is that you allow the user to make a different art/music project every time; the way we’re gonna do that is with customization! Every time you run your project, your user should be able to change at least one thing about the art produced, and one thing about the music produced.
First, let’s go into our index.html file, and under our submit button, add the following code:
<input type="color" id="color" value="#ff0000">
This input element will produce a color picker, which means the user can tap on it to select a color, and its value property will change to be that hex index. Now that we have this element in our code, let’s add it to our main.js so we can reference it there.
Great! Now, let’s look at the methods we’re going to be using here:
ctx.strokeStyle = #00000;
this sets the color of the line that we’re drawing in the line() function
color_picker.value
this returns the value of the color that the user has picked. Pssst, notice there’s no () bc this is a property not a method
Yay!! If you run your code now, while adjusting the color picker, you should notice something…
That’s right! Your line is changing color! You’re one step closer to an awesome artistic experience!!
Here is an optional challenge for our extra artistically inclined… instead of setting the line to one color, how can we set it to a gradient (where the user picks both/multiple colors) over time?
Section 2: drop that beat
Ok, we’ve gotten it all artsy up in here with our majestic palettes of customizable colors.

Credit to @Jordi (Jordan)
But let’s get it funky up in here.

Credit to @Space_Duck (Navya M)

Credit to @Jordi (Jordan)
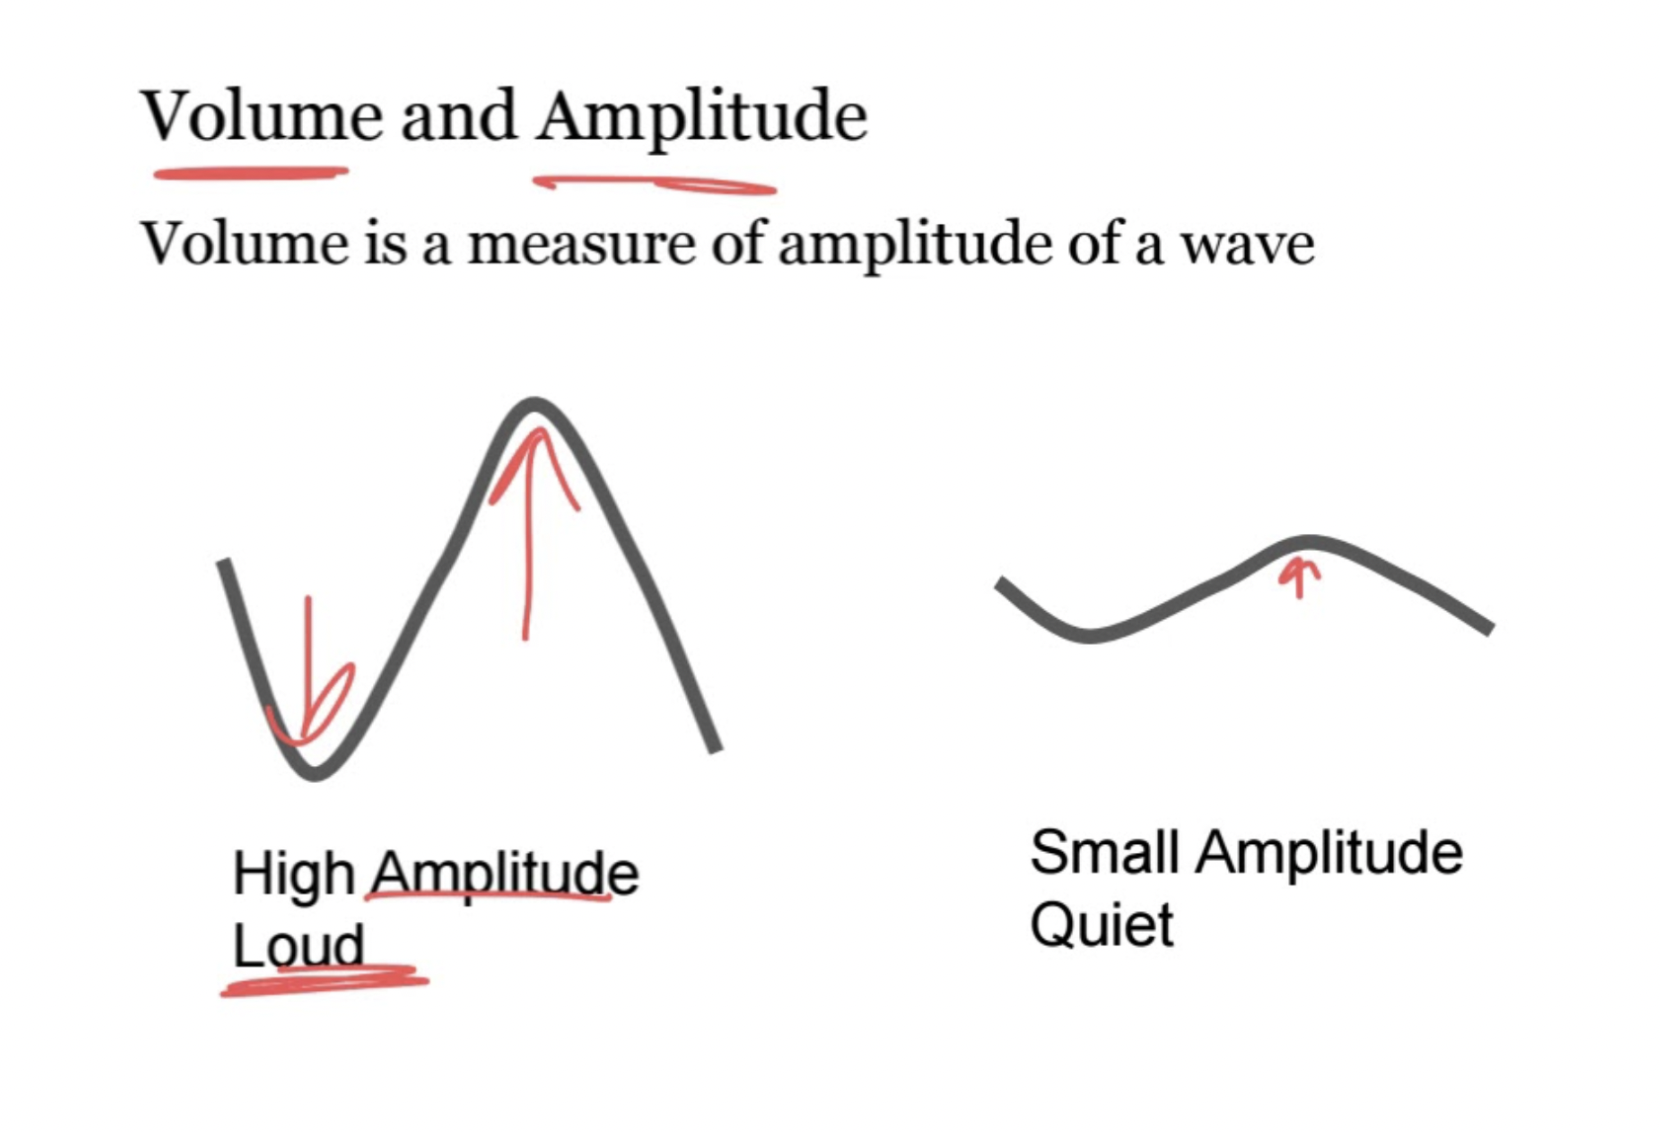
In this section, we’re going to be giving users the ability to change the volume of the sound that comes out of their laptop. In addition, this change will also affect the drawn sine waves, because in real-life, waves with higher volumes have higher amplitudes! So, when the user increases volume on a slider, not only will the sound come out louder, but their waves will be taller.
Let’s start by adding a slider input, which is gonna control the volume/amplitude. Add this to your index.html around where you added the color picker:
<input type="range" min="1" max="100" value="100" id="vol-slider">
Awesome! So we get the value that the user has picked on the volume slider the same way we got the hex code from the color picker: vol_slider.value
What we need to remember is that this input is controlling both the drawing and the music, so we need to include it in both areas. Let’s start with the frequency function.
gainNode.gain.setValueAtTime(100, audioCtx.currentTime);
oscillator.frequency.setValueAtTime(pitch, audioCtx.currentTime);
gainNode.gain.setValueAtTime(0, audioCtx.currentTime + ((timepernote/1000)-0.1));
So this is the code currently in our frequency function; this code means that at the beginning, when the function starts, we set the volume to 100% and set the frequency to our pitch. Then, after timepernote, we change the volume back down to 0%. Because remember, we don’t turn our audio source “on” and “off” in JS, we simply turn the volume up and down.
So, whenever we’re not playing a note, i.e. when we set the volume to 0%, the user should not have control over changing the volume of the pitch. We only want them to have control when the frequency is playing. We're gonna do this by using another setInterval method, and this time changing the value of gainNode.gain.value every millisecond until the sound is over, at which point we'll set it to 0 again. We should also start the volume at vol_slider.value instead of 100%.
Let’s start by initializing the setInterval method in frequency, right after we first set the volume to vol_slider.value - what used to be 100:
gainNode.gain.setValueAtTime(vol_slider.value, audioCtx.currentTime);
setting = setInterval(() => {gainNode.gain.value = vol_slider.value}, 1);
oscillator.frequency.setValueAtTime(pitch, audioCtx.currentTime);
...
The issue is, if we simply put clearInterval(setting); at the end of the function, then we’ll never be able to control volume. That’s because this section of code…
gainNode.gain.setValueAtTime(vol_slider.value, audioCtx.currentTime);
setting = setInterval(() => {gainNode.gain.value = vol_slider.value}, 1);
oscillator.frequency.setValueAtTime(pitch, audioCtx.currentTime);
gainNode.gain.setValueAtTime(0, audioCtx.currentTime + ((timepernote/1000)-0.1));
…doesn’t wait until the time is over to move on. So, we’d end up calling setInterval and clearInterval within milliseconds of each other, which is not what we want. Instead, we’re going to use this method:
setTimeout(() => { //code }, timetowait);
this command, called setTimeout, will run whatever code is inside it (denoted by my comment //code) after timetowait (in milliseconds) has been run.
Luckily, because we’re using the setValueAtTime method, we know exactly how long the frequency is playing! Specifically, (timepernote/1000)-0.1) seconds!
You may notice that I got rid of the line gainNode.gain.setValueAtTime(0, audioCtx.currentTime + ((timepernote/1000)-0.1)); This is because, since we set the volume to 0 at the end of the timeout, we don't need it anymore.
Section 3: drop that beat (but make it visual)
Ok, so we’ve already done the hard part of getting volumeset to reflect whether the user can change the volume. Now, all we have to do is let them change the amplitude of the wave when we’re drawing it!
Remember, we’re using this code to make our sine wave, which is found in our line() function:
y = height/2 + amplitude * Math.sin(x * ((2 * Math.PI * freq * (0.5*length))));
Now, to clean up your code, go ahead and get rid of the amplitude value wherever you initialized it.
If you run your code…
Voila! Our slider controls both the volume of the sound outputted, and the amplitude of the waves! Look at you, DJ! Only thing is, when volume is at 100%, it’s a little high. Let’s make our max amplitude 40. To do this, instead of making your y-amplitude vol_slider.value, make it (vol_slider.value/100)*40 so that you minimum is 0 and your max is 40.
Section 4: your turn!
Look. I’ve been with you for a while, but it’s been fun.
But in order to get your project approved, you have to change one thing about your program that is not in this tutorial.
One cool way to do this? Add a new user input! Here’s a list of things you could experiment with your user being able to change about the art/music, and some links to do some research on your own:
Beginner:
- Line thickness
- ype of sound coming out (sine, triangle, square, sawtooth)
Intermediate:
- Rotating your drawing
- Use closePath() and fill() to have some filled-in sine waves
Advanced:
- Add MULTIPLE sine waves!!!
- Add MULTIPLE streams of audio coming out!!
- Make it 3D! - inspired by @Space_Duck
Congratulations! 🎉 🎉 🎉If you're a highschooler who enjoys programming or tinkering with hardware, make sure to join Hack Club, the world's largest nonprofit empowering teenagers to make cool projects! There's tons of programs where you can get prizes for programming, get your hardware projects fully funded and you can join the awesome community of 100k+ teenagers who love making cool stuff (just like you!).