Make an AI Trip Planner for a Club Adventure
As a club, it's time to have a 5-day club retreat! Y'all can go on vacation anywhere, but the question is, where?
Take some time as a club to brainstorm the greatest place to take a vacation. Maybe it could be San Francisco, Los Angeles, or New York City. Whatever it is, take a minute to think of what this vacation would look like and what you all would do.
However, you might have run into a problem: you can't think of things to do! For example, in San Francisco, you might think of going to the Golden Gate Bridge, but what else?
This is where we can use AI and code to solve our problem by making an AI travel itinerary planner:

Try it out here!
Steps
- Clone a starter template for HTML CSS and JS
- Add inputs: trip destination, trip start date, trip end date
- Configure OpenAI API and get your API key
- Validate that all inputs are filled in
- Send a request to the OpenAI API, with a custom prompt including all the details. Make sure the response comes back in JSON
- When results come back, parse the JSON and display the events in a list
- Go on your next trip
Humble beginnings
So, you decide to get started! You log onto your laptop and then realize that your school has disabled downloading anything to your computer.
You take two deep breaths and realize that you can just use Replit to do this.
So you go to https://replit.com and sign up for an account.
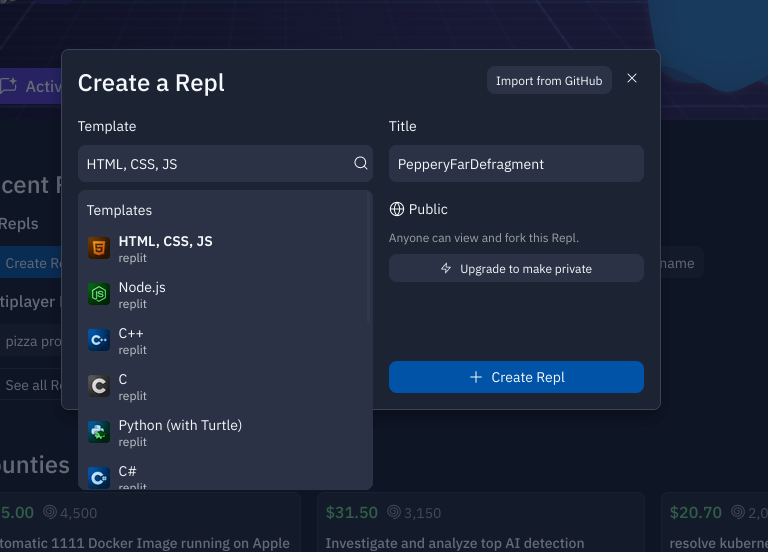
Then, you create a new project with the HTML, CSS, and JS template
Inputting information
For our code to know the details of our club trip, we need to have some way to input the destination and dates of our trip.
Inputting trip location
While there are many places we can visit in this world, the club must only select one. To do that, we have to add an <input/> element of type text to your HTML code and give it an easy-to-remember name:
<input type="text" name="location" />
You should put this between the <body></body> tags in your HTML!
If you save and run your code, on the right side of your screen you should be able to see a textbox that you can type in!
Adding trip dates
Now that we can input our trip destination, we need to define some travel dates. The process is similar to adding a text input, but instead of having an <input/> of type="text", we have an input that has type="date".
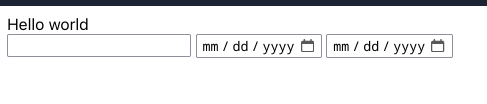
Underneath your location input, add two of these and assign them unique names:
<input type="date" name="myUniqueName" />
At this stage, you should have something like this:
Adding more inputs
Hey, sometimes we need more customization for our trips. We can do this by adding more <input/> elements that serve different purposes!
Configuring ChatGPT
ChatGPT. ChatGPT is the magical black box of the modern age. We don't know how it works, but it can spit out useful information, and we can especially use it to plan a club outing.

ChatGPT is actually so powerful that you can give it any trip destination and it will spit out a planned itinerary back. It's practically magic!
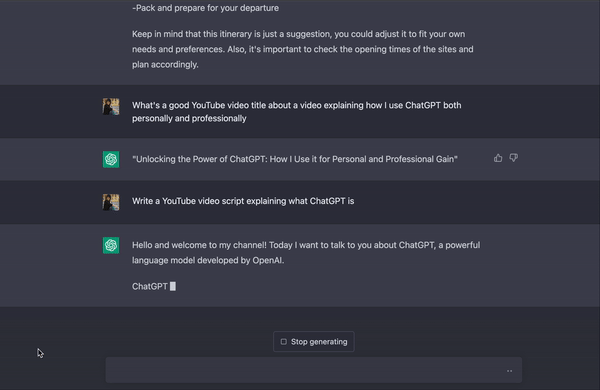
Usually, we're used to interacting with ChatGPT using their website like so:
However, we can't go and interact with the website using our code! This is why we use the official ChatGPT API.
What's an API?
API Textbook Definition:
A · P · I
An application programming interface (API) is a specification intended to be used as an interface by software components to communicate with each other.
Our Cool And Easy to Digest™ Definition:
A · P · I
An API is the way our code can talk to someone else's code. Sounds weird right? In this case, OpenAI has their ChatGPT code running in some server somewhere, and our app needs to use ChatGPT. Many people like us also want to use ChatGPT in our code, so OpenAI created something called the "ChatGPT API" so we can use ChatGPT's code in our app.
Types of Requests
There are four types of requests: GET, POST, PUT, and DELETE
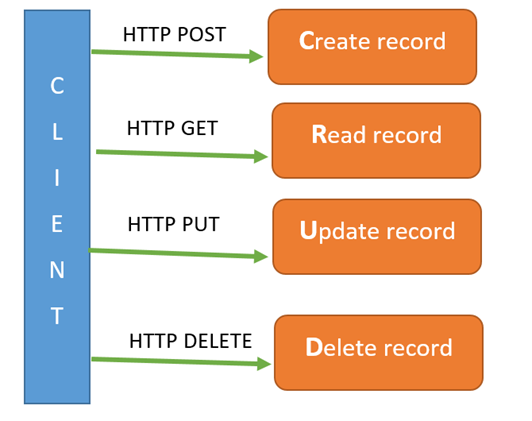
GET: We tell the API to fetch some data for us to use
POST: We tell the API to create some data for us
PUT: We tell the API to update some data for us
DELETE: Obviously, we tell the API to delete some data for us
We can select which type of request we want to send from our client!
⚠️🚨 Make sure to specify the correct request type! For example, if you send a GET request to an endpoint that requires a POST request, your request won't go through :(
Communicating with the ChatGPT API
The ChatGPT API that we're using (https://api.openai.com/v1/chat/completions) requires a POST request.
Request Body
Since we're going to be sending a POST request, that also means that we have to send a request body as well.
Think of the request as a cardboard box and the body being the stuff that goes inside that box. We (our browser) can then package and ship that box to the API.
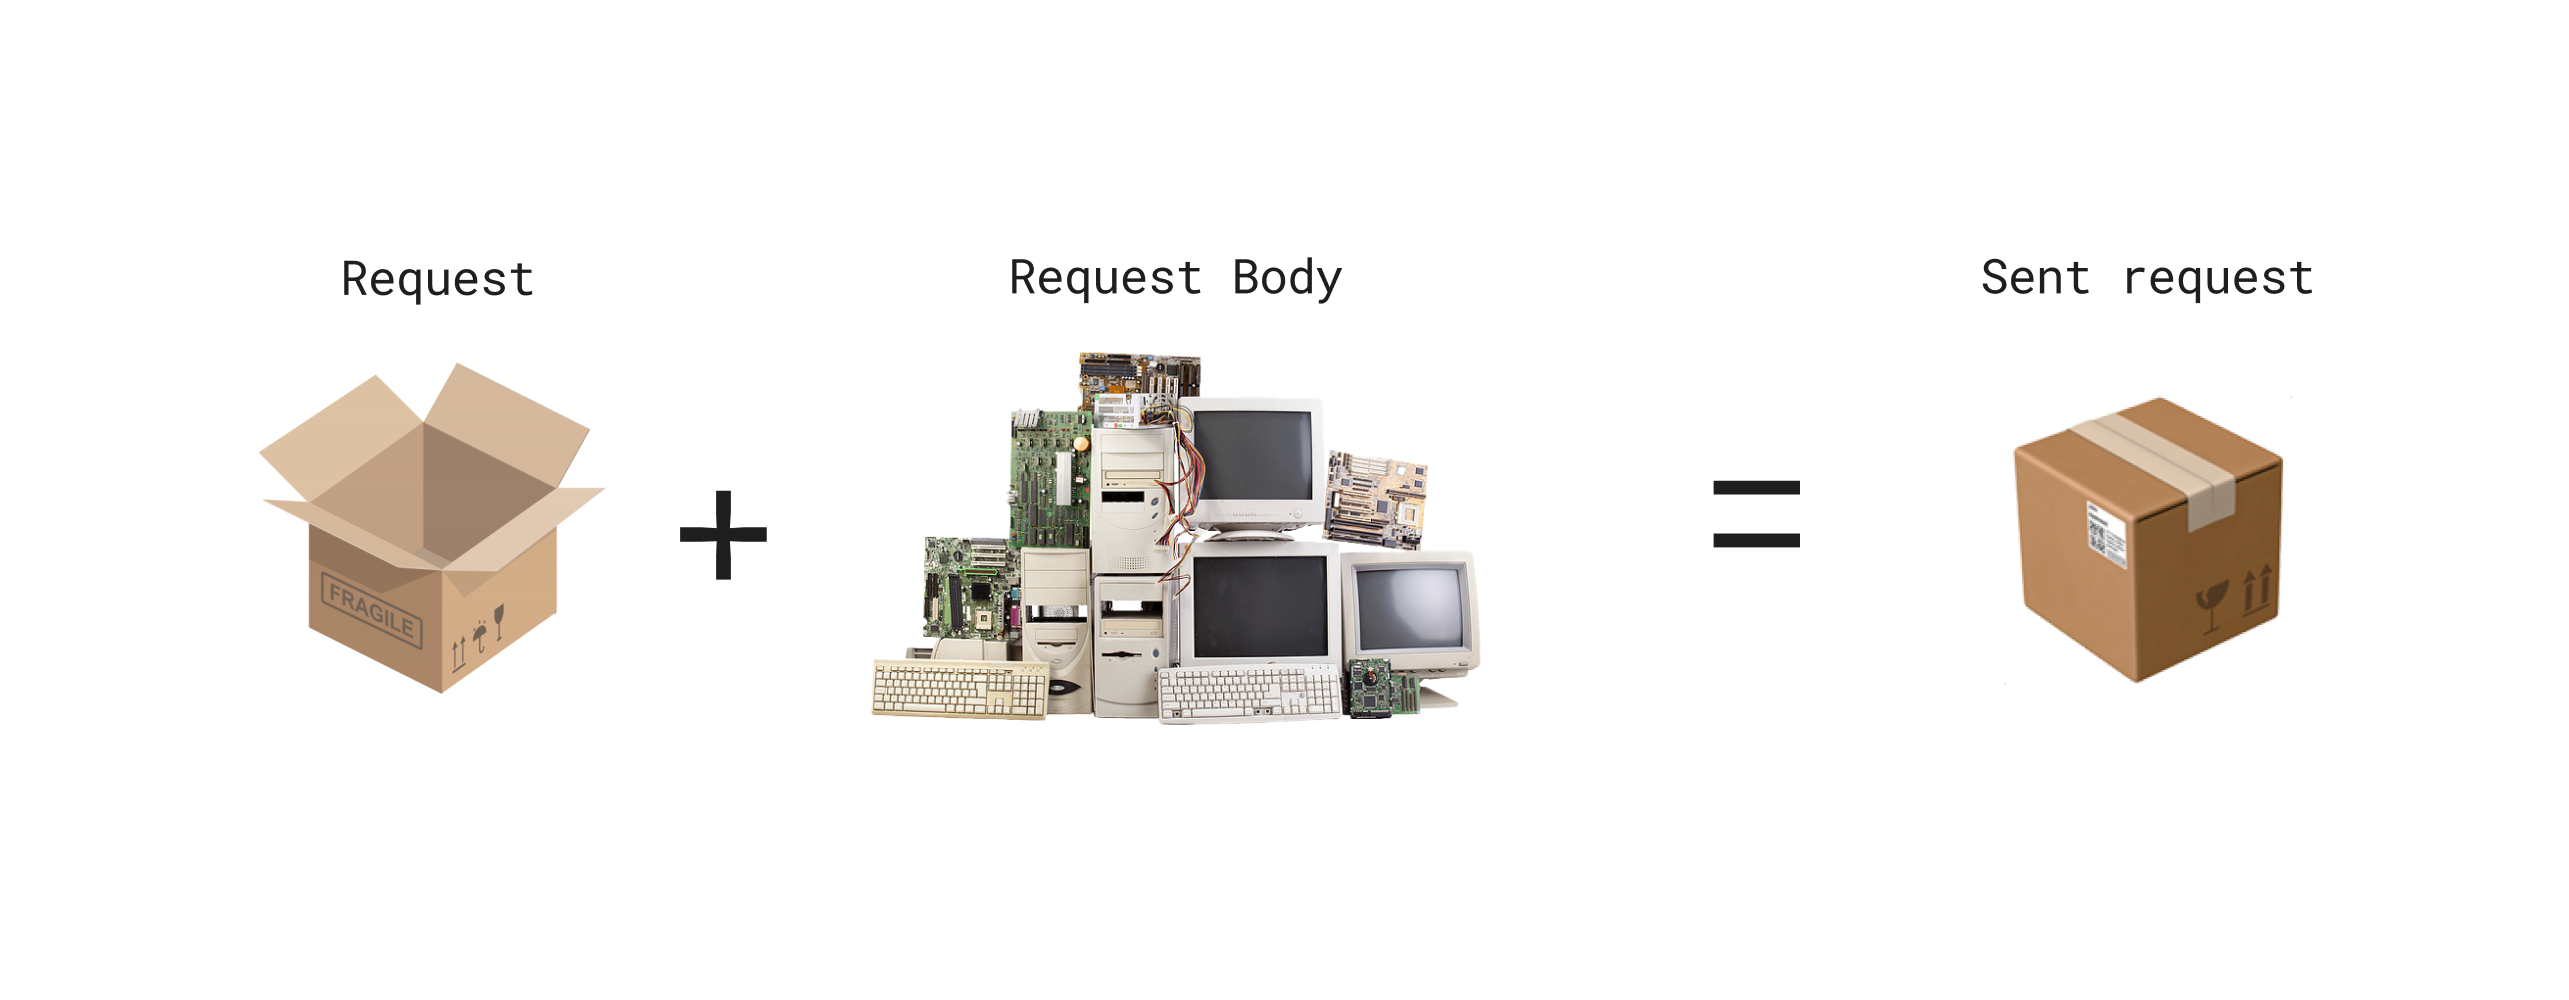
Here's the request body that we use to communicate with the ChatGPT API:
{
      'model': 'gpt-3.5-turbo',
      'messages': [
        {
          'role': 'user',
          'content': `What US state is Shelburne in?`
        }
    ],
}
Let's break this down:
modelis selecting which "brain" ChatGPT uses. Some brains are specialized in things other than text, such as image processing or writing code, but we want to use the one that's the smartest and has an overarching view of the world:gpt-3.5-turbo. This is the model that the ChatGPT website uses, so it's always a good choice.messagesis an array of the JSON objects (the messages) that you want to sent to this "brain" of ChatGPT. The main use of having this array is to add previous responses in order to ask ChatGPT follow-up questions (e.g. "What US state is Shelburne in?", "What country is that state in?")- The structure of a message:
roleis the person who is saying the message. In this case, since we are sending the message, we will assume the role ofusercontentis the actual message that you want to send to ChatGPT (psst: This is what you type in on the ChatGPT website)
Let's get back to coding!

Go to script.js from your Replit editor and create a function. I called it getItinerary() but feel free to call it anything!
function getItinerary() {
  console.log("hello there!")
}
Getting the value of our <input/>s
Remember the <input/> elements that we created in index.html? Yeah, we need to extract the information that the user inputs into them!
Wrapping with <form/>
To get the value of our input elements, we need to wrap them with the <form/> element. Think of this as an element that bundles our inputs into an easy-to-manage way.
 <form>
    <input type="text" name="location" />
    <input name="startdate" type="date">
    <input name="enddate" type="date">
  </form>
We need to add a submit button!
Getting the values into our JavaScript code
If you submit the form right now, all it does is reload and clear the values from the form.
We can add this to the opening form tag like so:
<form onsubmit="">
Ideally, this form should be able to pass the values of our <input/> parameters to our JavaScript code, so we can set the onsubmit property to the name of our function in the script.js file. In my case, it would look like this:
<form onsubmit="getItinerary()"
⚠️ Key tip: Keep ALL of your HTML code below the <script src="script.js"></script> tag for your JavaScript to run
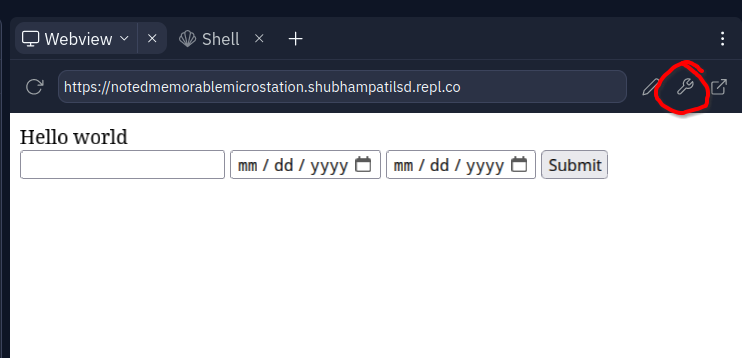
Let's try running this and see if we get a console.log in the browser console!
Hint: Open the developer tools in Replit to see the console! It's the wrench icon right here:
WHAT? That didn't work?
Hmm, seems like we need to debug this out
After a little searching, I found this. Maybe it could help us?
The form's default action is to just refresh the page, but we need to prevent that (since we need it to run our JavaScript code).
The preventDefault() function needs to be run from our JavaScript, and onsubmit is considered an event, so we can pass this event to our JS code!
We can pass the event like so:
<form onsubmit="getItinerary(event)">
Then, in our JavaScript, we can accept the event as a function parameter:
function getItinerary(event) {...}
Then, we can run event.preventDefault() to prevent the form from just refreshing the page:
function getItinerary(event) {
  event.preventDefault()
  console.log("Hello there")
}
Nice! We just got something in the console!
We're making so much progress! Great work!

Another secret in event
Now, how do we actually get the values that the user types/selects in our <input/> elements?
Through our very trusty event parameter!
More specifically, we can access them under event.target
//ex: San Francisco
event.target.NAME_OF_INPUT.value
The code above is an example of how we can get the value of any of our inputs.
Go ahead, under the event.preventDefault(), add three more console.log calls to get the value of each <input/> (remember to substitute the NAME_OF_INPUT with the actual name of the input elements. In my case, they would be something like location, startdate, and enddate).
Here's how I did it (if you have different <input/> names you should use those):
function getItinerary(event) {

  event.preventDefault()

  console.log(event.target.location.value);
  console.log(event.target.startdate.value);
  console.log(event.target.enddate.value);

  console.log("Hello there")
}
Also remember to add any additional input elements that you made at the start!
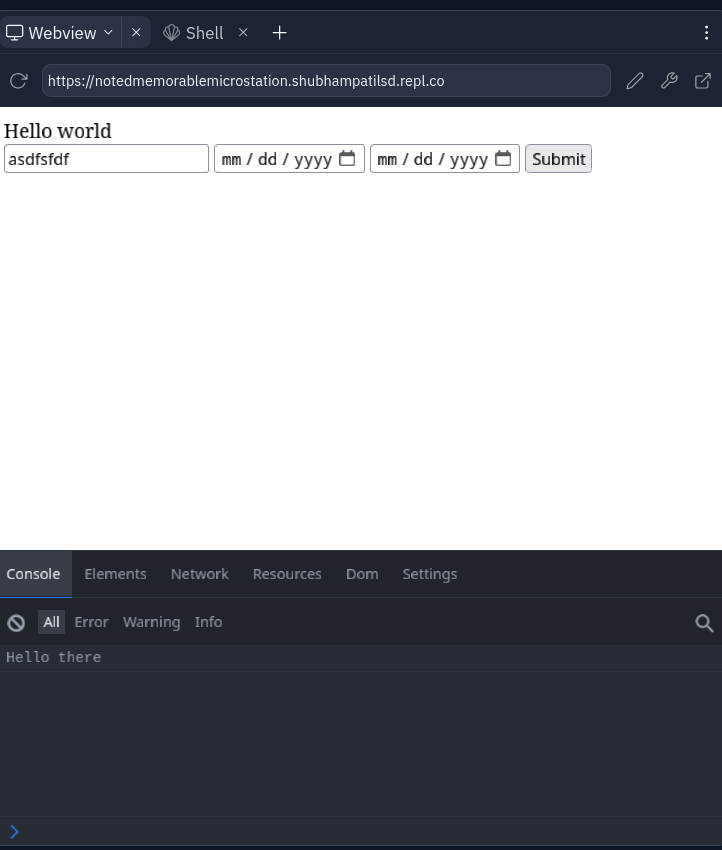
Run your code, type in your location and dates, click submit, and check in the console! This is what I got:
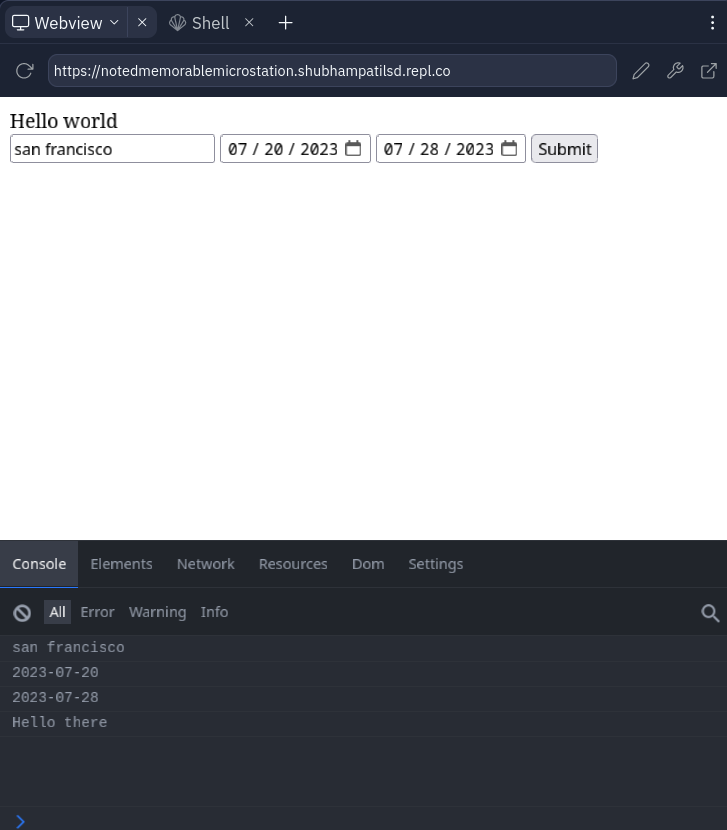
Interacting with the ChatGPT API
This is going great so far! We have all the values from our input elements. Now the only thing left is to communicate with the ChatGPT API.
Calling the API with fetch
 To make a request to our API, we're going to be using something called
 fetch. It's a tool baked into every browser, and it enables us to send HTTP requests.
Here's a general skeleton of how to use fetch:
fetch('API_URL', {
    method: '', //GET, POST, PUT, DELETE
    //optional, meant for security checks (authentication)
    headers: {
      ...
    },
    //NOT needed with GET request
    body: JSON.stringify({
     ...
    })
})
Break it down for me
Sure!
API_URLis the first parameter of thefetchfunction. Here, we should put the URL of the API that we want to make a request to.methodis the type of HTTP request that we want to send (rememberGET,POST,PUT,DELETE?)headersis meant for authentication data such as an API key. It basically allows us to put information so that the API can verify if we are allowed to access an endpoint! This is not always required, but the ChatGPT API requires us to add this information.bodyis the body of the request (the stuff that we put inside it)
Let's add this skeleton to our code
Copy paste that and put it underneath all the console.log statements that we had.
Don't mind the red squiggly lines/errors that come up, we'll resolve those!

Let's replace a couple of those placeholder values:
👋 Psst: If you're a club leader, check out #open-ai-token in the Slack for an alternative to the OpenAI API!
Let's make some of those changes:
fetch('https://api.openai.com/v1/chat/completions', {
    method: 'POST',
    //optional, meant for security checks (authentication)
    headers: {
      ...
    },
    //NOT needed with GET request
    body: JSON.stringify({
     ...
    })
})
What's this headers thing?
Well, some APIs need to verify that we're authorized to use them. This could be because it's too expensive to run those APIs and they need some way to limit usage or keep track of who is using them.
Let's add something to our diagram:
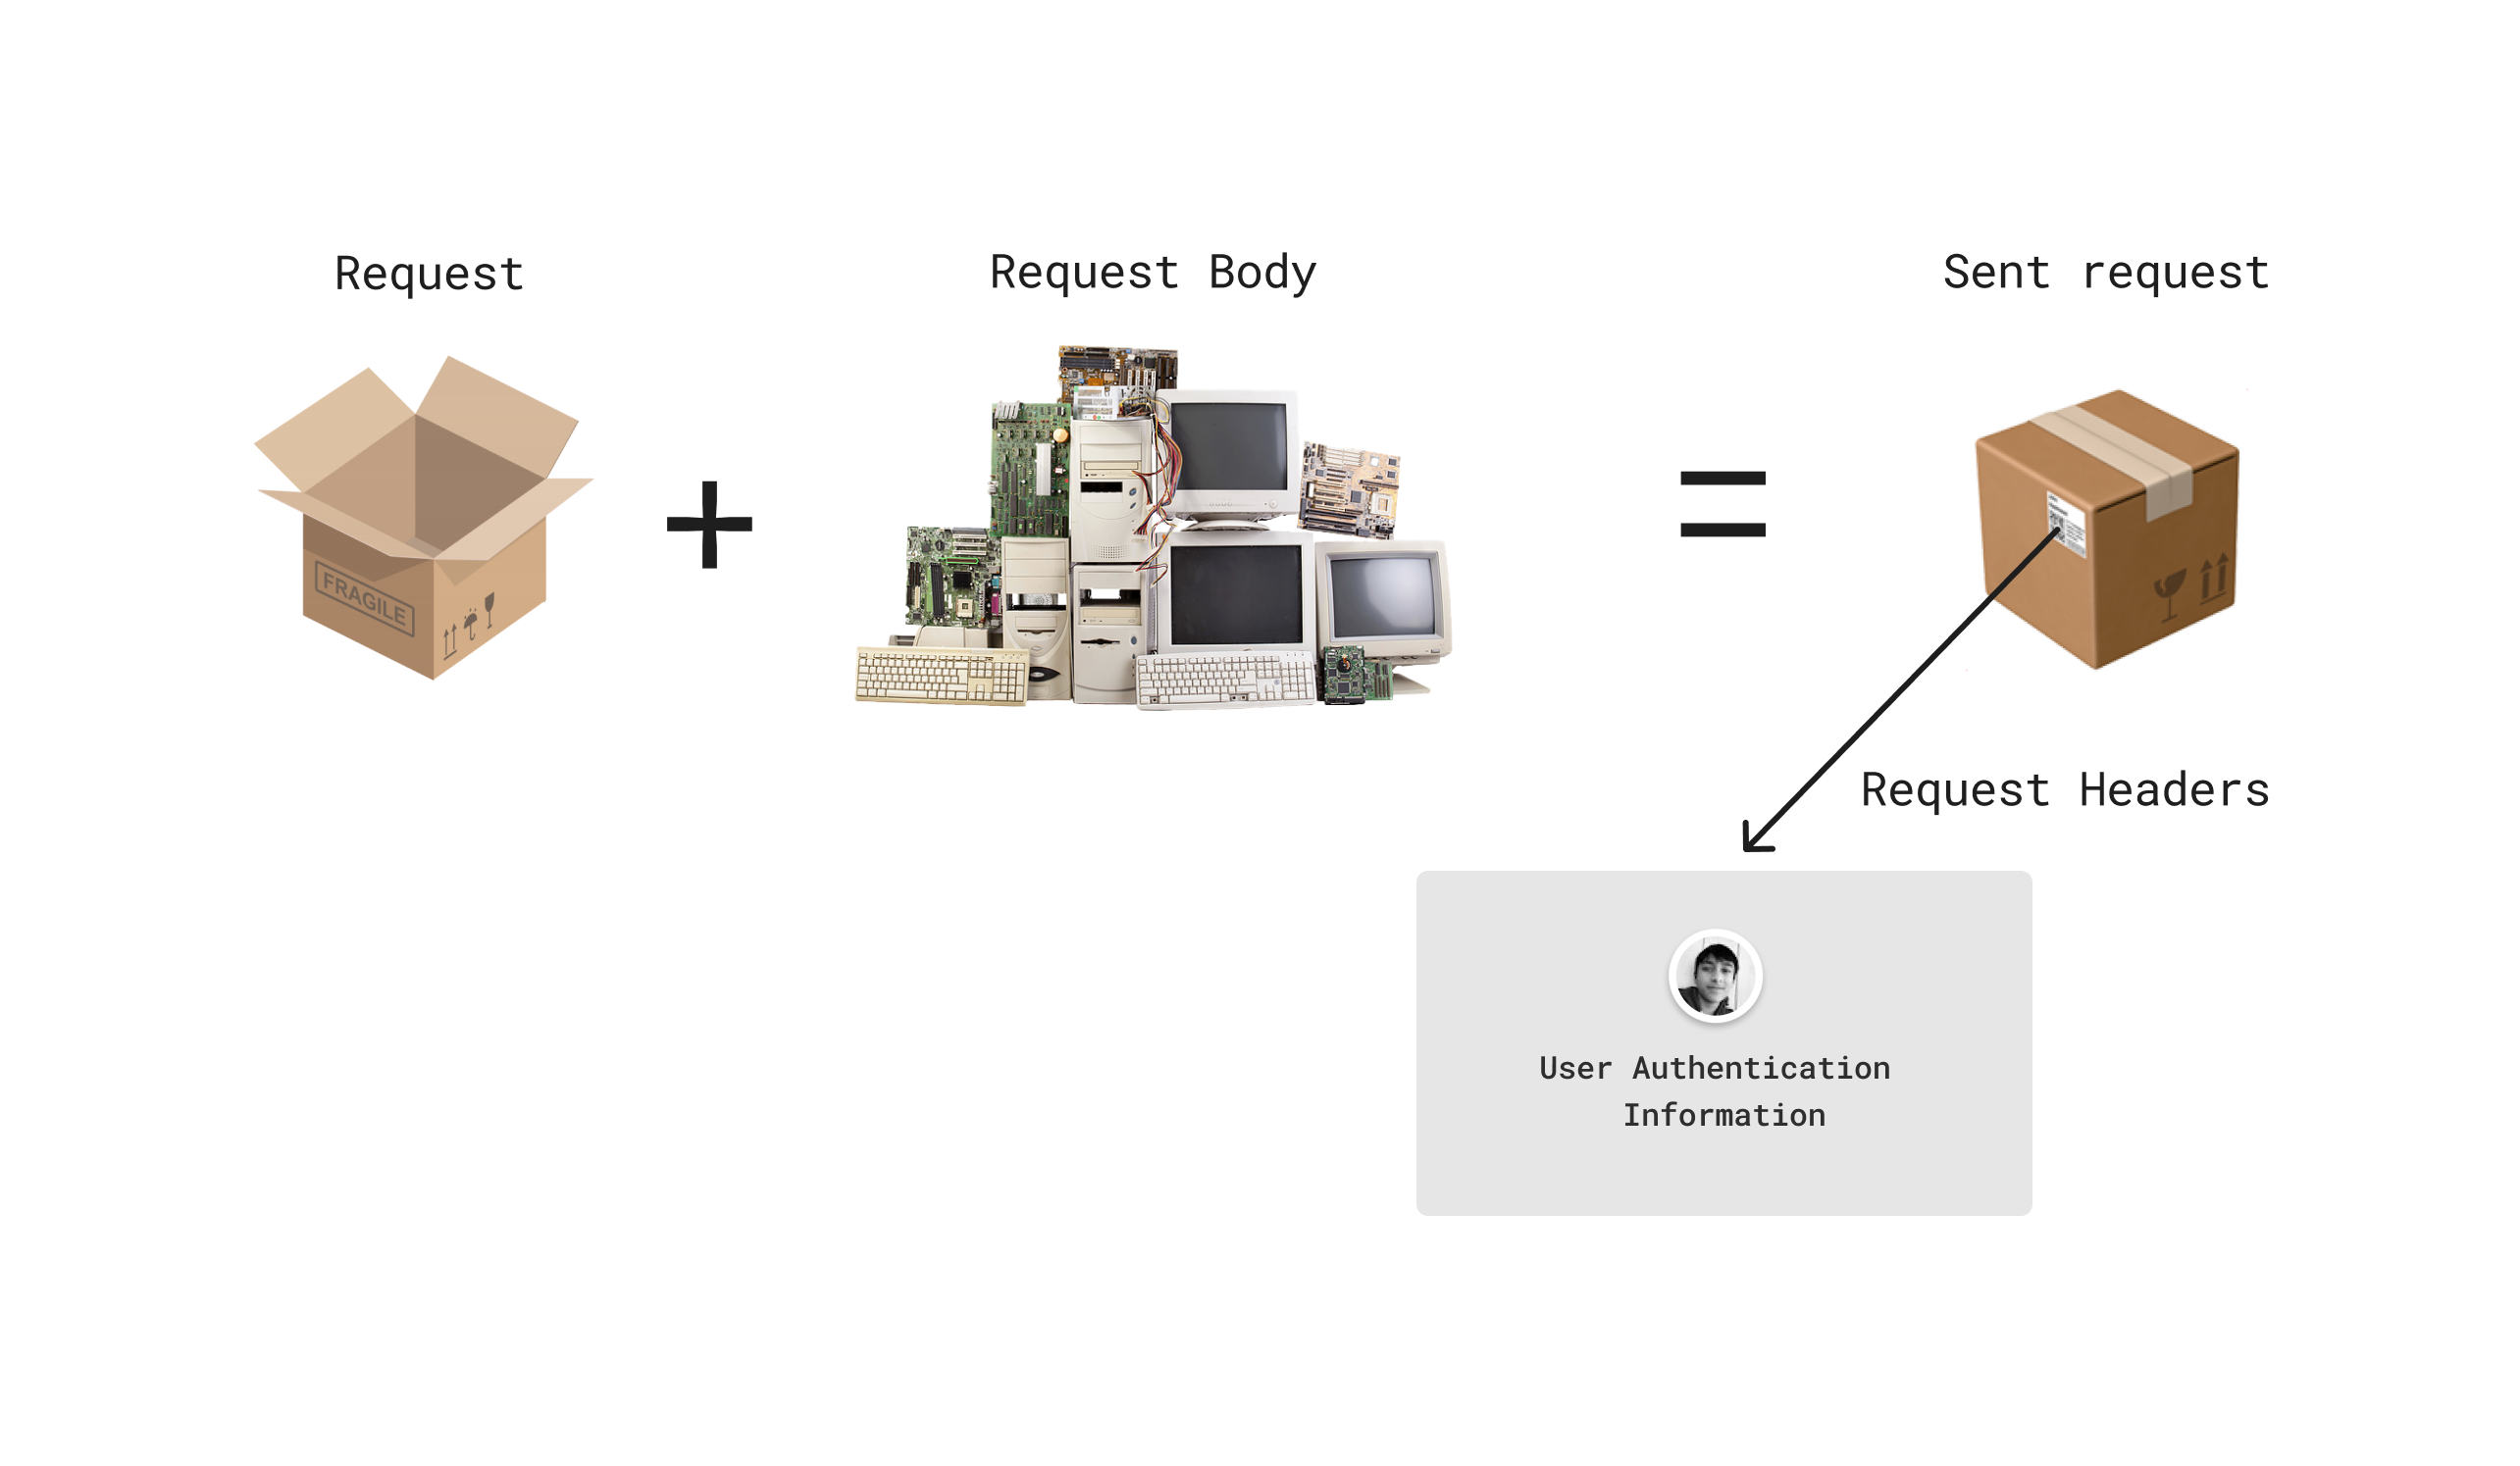
You know how the labels on a package can identify who sent the package? Likewise, request headers also identify who is sending the request.
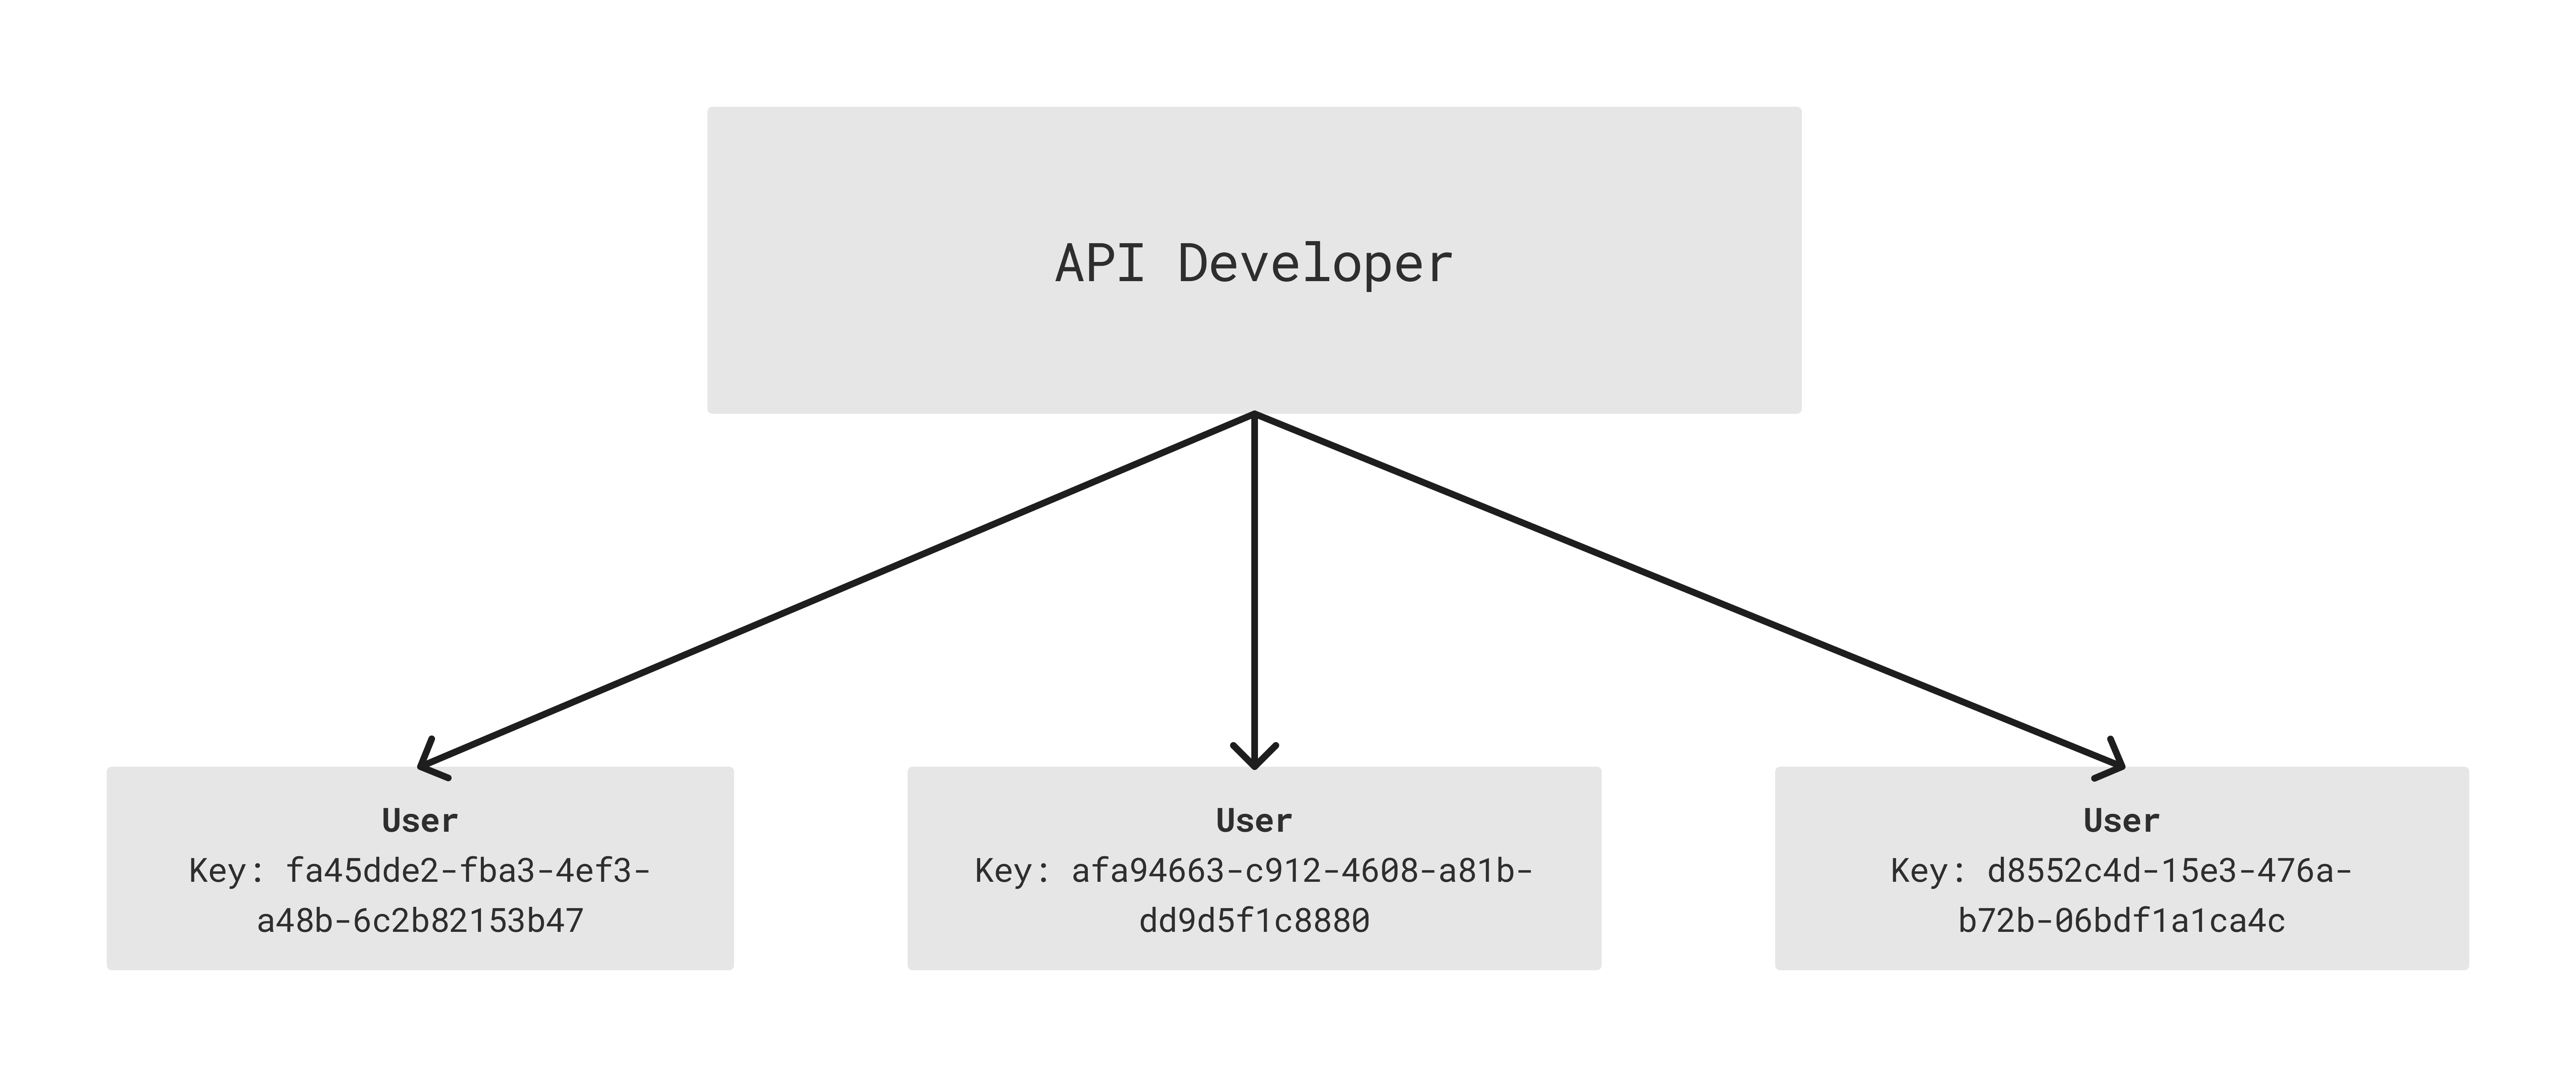
Most often, APIs use something called an API key to check who sent the information. They distribute these keys and each one is unique, which means that given a key, they can find out who they handed it out to.
To contact the ChatGPT API, we need to send these headers in the fetch request:
headers: {
      'Content-Type': 'application/json',
      'Authorization': 'Bearer OPENAI_API_KEY'
},
Let's break this down:
Content-Typetells the API what kind of data theheadersandbodyare. In this case, we are sending both inJSONformat, so we specify that we're sendingJSON.Authorizationis to send the API key that we have
Hmm, what API Key should I get? Good observation, we need an API key. Here are the steps on how to do so:
- Create an account on the OpenAI Platform
- Go to the API keys page:

- Create a new API key secret:
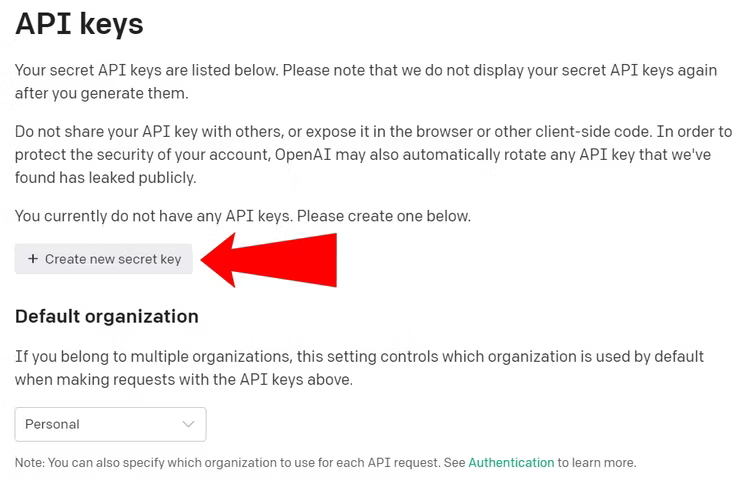
- Replace
OPENAI_API_KEYwith your new API key!
Now, your fetch request should look something like this:
fetch('https://api.openai.com/v1/chat/completions', {
    method: 'POST',
    //optional, meant for security checks (authentication)
    headers: {
      'Content-Type': 'application/json',
      'Authorization': 'Bearer OPENAI_API_KEY'
  },
    //NOT needed with GET request
    body: JSON.stringify({
     ...
    })
})
What should I put in body?
Remember, the code that we had earlier for the request body? We need to modify that a little bit.
Here's what we're starting with:
{
      'model': 'gpt-3.5-turbo',
      'messages': [
        {
          'role': 'user',
          'content': `What US state is Shelburne in?`
        }
    ],
}
The main thing we need to edit is the value in messages. We can keep the role as it is, but we need to change content.
Now what exactly should our content be? Well, it has to be a prompt for ChatGPT!
Take some time with your club to think of a prompt. If one of your club members is making a meal planner for your trip, their prompt should include something about food. If you have additional <input/> elements that specify the type of trip, you should add them here.
If you need some inspiration here is what my prompt looks like:
{
      'model': 'gpt-3.5-turbo',
      'messages': [
        {
          'role': 'user',
          'content': `plan a trip itinerary for someone going to ${event.target.location.value} from ${event.target.startdate.value} to ${event.target.enddate.value}. have about 3 or 4 things to do per day. respond ONLY with an array that has JSON objects with the parameters \`date\` \`eventTitle\` \`startTime\` \`endTime\`
          \`\`\`
          `
        }
    ],
}
Here, we're asking for a response in JSON format so that we can parse it later on. In this array of JSON objects, it will have the date, title, start time, and end time of each event in our trip itinerary. It will give us about 3-4 events per day, which will be great for our users!
Notice how we are asking ChatGPT to return certain values in our JSON. Think about what else we could ask it to return.
Note: I'm using event.target.location.value, event.target.startdate.value, and event.target.enddate.value here. If you used different values you should change these, along with the custom inputs that you added
Progress check
Your fetch request should look something like this now (with your own custom prompt):
fetch('https://api.openai.com/v1/chat/completions', {
    method: 'POST',
    headers: {
      'Content-Type': 'application/json',
      'Authorization': 'Bearer OPENAI_API_KEY'
    },

    body: JSON.stringify({
      'model': 'gpt-3.5-turbo',
      'messages': [
        {
          'role': 'user',
          'content': `plan a trip itinerary for someone going to ${event.target.location.value} from ${event.target.startdate.value} to ${event.target.enddate.value}. have about 3 or 4 things to do per day. respond ONLY with an array that has JSON objects with the parameters \`date\` \`eventTitle\` \`startTime\` \`endTime\`
          \`\`\`
          `
        }
      ],
    })
  })
Parsing the API response
At this point, we are making a request to the ChatGPT API, but we aren't getting its output.
Our fetch call returns a JavaScript promise, so we need to use .then() to get the response from the API.
fetch('...',{
...
).then(result => result.json()) //convert to JSON
Our first .then() resolves the API request and extracts what it returns. It then converts it to JSON, which contains all of the itinerary details.
However, result.json() returns another promise.
fetch('...',{
...
).then(result => result.json()) //convert to JSON
 .then(eventsResponse =>{
   console.log(eventsResponse)
 })
Here is an example of what eventsResponse looks like:
{
  "id": "chatcmpl-7eGsZyLk57VhjL9NE5BTMB7fxLGyh",
  "object": "chat.completion",
  "created": 1689832359,
  "model": "gpt-3.5-turbo-0613",
  "choices": [
    {
      "index": 0,
      "message": {
        "role": "assistant",
        "content": "..."
      },
      "finish_reason": "stop"
    }
  ],
  "usage": {
    "prompt_tokens": 76,
    "completion_tokens": 276,
    "total_tokens": 352
  }
}
This is JSON output, and we need to get to the content key. We can do that with eventsResponse.choices[0].message.content:
fetch('...',{
...
).then(result => result.json()) //convert to JSON
 .then(eventsResponse =>{
   console.log(eventsResponse)
   console.log(eventsResponse.choices[0].message.content)
 })
If we run this and check the second console.log, we'll see a massive (almost cryptic) string. This is because content is of type string, not a JavaScript Object.
Here's how we can convert content to a JS object:
fetch('...',{
...
).then(result => result.json()) //convert to JSON
 .then(eventsResponse =>{
  const events = JSON.parse(eventsResponse.choices[0].message.content)

  console.log(events)
 })
Now, the variable events is a JavaScript object, and we can access the data that it has!
If we console.log(events), it should look something like this:
[
  {
    "date": "2023-07-19",
    "eventTitle": "Visit Golden Gate Bridge",
    "startTime": "10:00",
    "endTime": "12:00"
  },
  {
    "date": "2023-07-19",
    "eventTitle": "Explore Fisherman's Wharf",
    "startTime": "14:00",
    "endTime": "17:00"
  },
  {
    "date": "2023-07-19",
    "eventTitle": "Enjoy dinner at Chinatown",
    "startTime": "18:00",
    "endTime": "20:00"
  },
  {
    "date": "2023-07-20",
    "eventTitle": "Visit Alcatraz Island",
    "startTime": "09:00",
    "endTime": "12:00"
  },
  {
    "date": "2023-07-20",
    "eventTitle": "Explore the Exploratorium",
    "startTime": "14:00",
    "endTime": "17:00"
  },
  {
    "date": "2023-07-20",
    "eventTitle": "Watch a baseball game at AT&T Park",
    "startTime": "19:00",
    "endTime": "22:00"
  }
]
Adding itinerary events to the page
This has been going great so far! We're so close, we just need to add a couple of things.
Now we need to show the itinerary on the main page. We can do this by adding a new HTML "card" for each event in the itinerary.
Go to index.html again and add a <div> element with any id. This is how our JavaScript code identifies which element to add the itinerary to.
Note: put this underneath the <form>
<div id="eventlist"></div>
Back to our JavaScript code!
This is what it looks like right now:
fetch('...',{
...
).then(result => result.json()) //convert to JSON
 .then(eventsResponse =>{
  const events = JSON.parse(eventsResponse.choices[0].message.content)

  console.log(events)
 })
Since events is an array of JS objects, we can use a simple for loop to go through the array. In the loop, we can generate some HTML with the event's details in order to add it to the page.
First, let's create a for loop:
for(const event of events){

}
Now, event represents each individual event in the itinerary. Here's an example of how it looks:
{
    date: "2023-07-19",
    eventTitle: "Visit Golden Gate Bridge",
    startTime: "10:00",
    endTime: "12:00"
},
Let's edit the loop to give us back some HTML!
for(const event of events){
  let htmlGenerated = `<div>

      <h3>${event.eventTitle}</h3>
      <p>${new Date(event.date).toLocaleDateString(undefined, { dateStyle: "medium" })}</p>

      <p>${event.startTime} - ${event.endTime}</p>

      </div>`
}
Let's break some things down here:
- We're creating a string that has HTML elements inside of it. This is sort of a "template"
- Then, we can add the details of each specific event using template literals
If we console.log the variable htmlGenerated now, we should get something like this:
<div> <h3>Cable Car Ride</h3> <p>Jul 19, 2023</p> <p>3:30 PM - 5:30 PM</p> </div>
Notice how it looks like HTML? Now we need to add this to the page.
Back to the fetch request!
Here's how it's lookin' right now:
fetch('...',{
...
).then(result => result.json()) //convert to JSON
 .then(eventsResponse =>{
  const events = JSON.parse(eventsResponse.choices[0].message.content)
  for(const event of events){
    let htmlGenerated = `<div>

      <h3>${event.eventTitle}</h3>
      <p>${new Date(event.date).toLocaleDateString(undefined, {dateStyle: "medium" })}</p>

      <p>${event.startTime} - ${event.endTime}</p>

      </div>`
  }
 })
Now, htmlGenerated needs to be added to the website.
- Let's move the
htmlGenerateddeclaration outside theforloop like so:
let htmlGenerated=""

for(const events of events){
  ...
}
- Then, tack on each generated string to this
htmlGenerated variablelike so:
let htmlGenerated=""

for(const events of events){
  //add it on
  htmlGenerated += `<div>

      <h3>${event.eventTitle}</h3>
      <p>${new Date(event.date).toLocaleDateString(undefined, {dateStyle: "medium" })}</p>

      <p>${event.startTime} - ${event.endTime}</p>

      </div>`
}
Now that all the events are in HTML in htmlGenerated, we now have to shove this all inside the <div/> we created earlier:
<div id="eventlist"></div>
Under the for loop, we can add this line of code:
document.getElementById("eventlist").innerHTML += htmlGenerated
Let's break this down:
- We select the
<div>from our HTML code - We put our HTML of events inside the
<div/>
This would mimic writing HTML like this, for example:
<div id="eventlist">
  <div> <h3>Cable Car Ride</h3> <p>Jul 19, 2023</p> <p>3:30 PM - 5:30 PM</p> </div>
</div>
Notice how our event is inside the <div/>, which means that it will now get rendered on the page!
This is my entire script.js file as of now:
function getItinerary(e) {

    e.preventDefault()

    console.log(e.target.location.value)

    fetch('https://api.openai.com/v1/chat/completions', {
        method: 'POST',
        headers: {
            'Content-Type': 'application/json',
            'Authorization': 'Bearer OPEN_AI_API_KEY'
        },

        body: JSON.stringify({
            'model': 'gpt-3.5-turbo',
            'messages': [{
                'role': 'user',
                'content': `plan a trip itinerary for someone going to ${e.target.location.value} from ${e.target.startdate.value} to ${e.target.enddate.value}. have about 3 or 4 things to do per day. respond ONLY with an array that has JSON objects with the parameters \`date\` \`eventTitle\` \`startTime\` \`endTime\`
          \`\`\`
          `
            }],
        })
    }).then(result => result.json()).then(eventsResponse => {

        const events = JSON.parse(eventsResponse.choices[0].message.content)
        let htmlGenerated = ""
        for (const event of events) {
            //add it on
            htmlGenerated += `<div>
      <h3>${event.eventTitle}</h3>
      <p>${new Date(event.date).toLocaleDateString(undefined, {dateStyle: "medium" })}</p>

      <p>${event.startTime} - ${event.endTime}</p>

      </div>`
        }

        document.getElementById("eventlist").innerHTML = htmlGenerated
    });
}
And this is my index.html file:
<!DOCTYPE html>
<html>

<head>
  <meta charset="utf-8">
  <meta name="viewport" content="width=device-width">
  <title>replit</title>
  <link href="style.css" rel="stylesheet" type="text/css" />
</head>

<body>
  Hello world
  <script src="script.js"></script>

  <form onsubmit="getItinerary(event)">
    <input type="text" name="location" />
    <input name="startdate" type="date">
    <input name="enddate" type="date">
    <input type="submit" value="Submit" />
  </form>

  <div id="eventlist"></div>
</body>

</html>
Done! 🎉
Now, if you run this code, and type in some inputs, you should get a trip itinerary beautifully displayed on your screen!
Result:

What next?

And now we have our club trip planned! You might be wondering what we should do now. Since we have the core functionality, you're free to take this demo home and tinker with it!
Ideas: Maybe we can add some functionality to only go to Starbucks or only go to boba shops on the trip? Maybe we can make it look a bit nicer! The possibilities are endless.

We hope that you've built this and came out with more knowledge about ChatGPT!
Now you're truly an AI wizard 😎
Congratulations! 🎉 🎉 🎉If you're a highschooler who enjoys programming or tinkering with hardware, make sure to join Hack Club, the world's largest nonprofit empowering teenagers to make cool projects! There's tons of programs where you can get prizes for programming, get your hardware projects fully funded and you can join the awesome community of 100k+ teenagers who love making cool stuff (just like you!).