Creating Your Own 3D Club Lofi Animation
~60+ Minutes, Basic javascript and html knowledge needed
( This is a demo animation, this jam encourages to create your own! )
Demo Animation Source Code of Demo
Note for leaders! This jam will include a gallery, so you can publish your members animations in a form of a playlist. It will also include an online tool for merging all the videos together and adding music, till the website gets released you must create the playlist yourself.
Note for learners! Creating your own lofi animation may seem tedious and hard at the start but after setting up the renderer everything after is a breeze ( like literally ). You will have so much fun! You can do it!
Table Of Contents - Project Outline:
- Forking the template, replit fundamentals
- Quick explanation of the template
- THREE.JS Basics
- Adding a camera, sample cubes and cube animation!
- Adding textures
- Three.js must haves
- Recording functionality
- The start of your solo adventure ✨ Optional tasks for those who have more time ✨
- Import 3D models
- Lighting and Object scaling
Forking the Template
This is the first part of your wonderful journey to Three.js! The template includes assets that you might use in your lofi animation, everything will be lofi themed so feel free to use them!
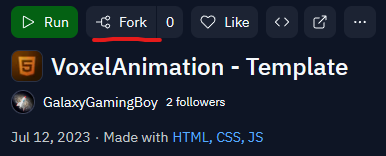
You will fork the template from this link from.
After visiting the link on the right hand side of the screen there is a FORK button. Click it!
After clicking enter your voxel animation name and click FORK REPL.
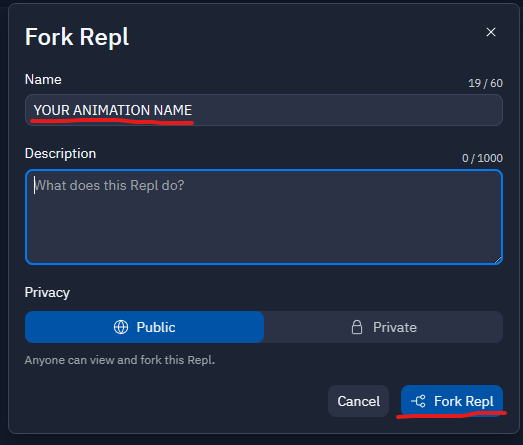
Here is a quick GIF of the proccess, if you want to verify! :D

Well now congratulations! You are a master of forking projects, here is a celebratory meme for you!
Explaining Replit
After that your project that the animation will live in should be loaded into the same tab.
It should look like this:
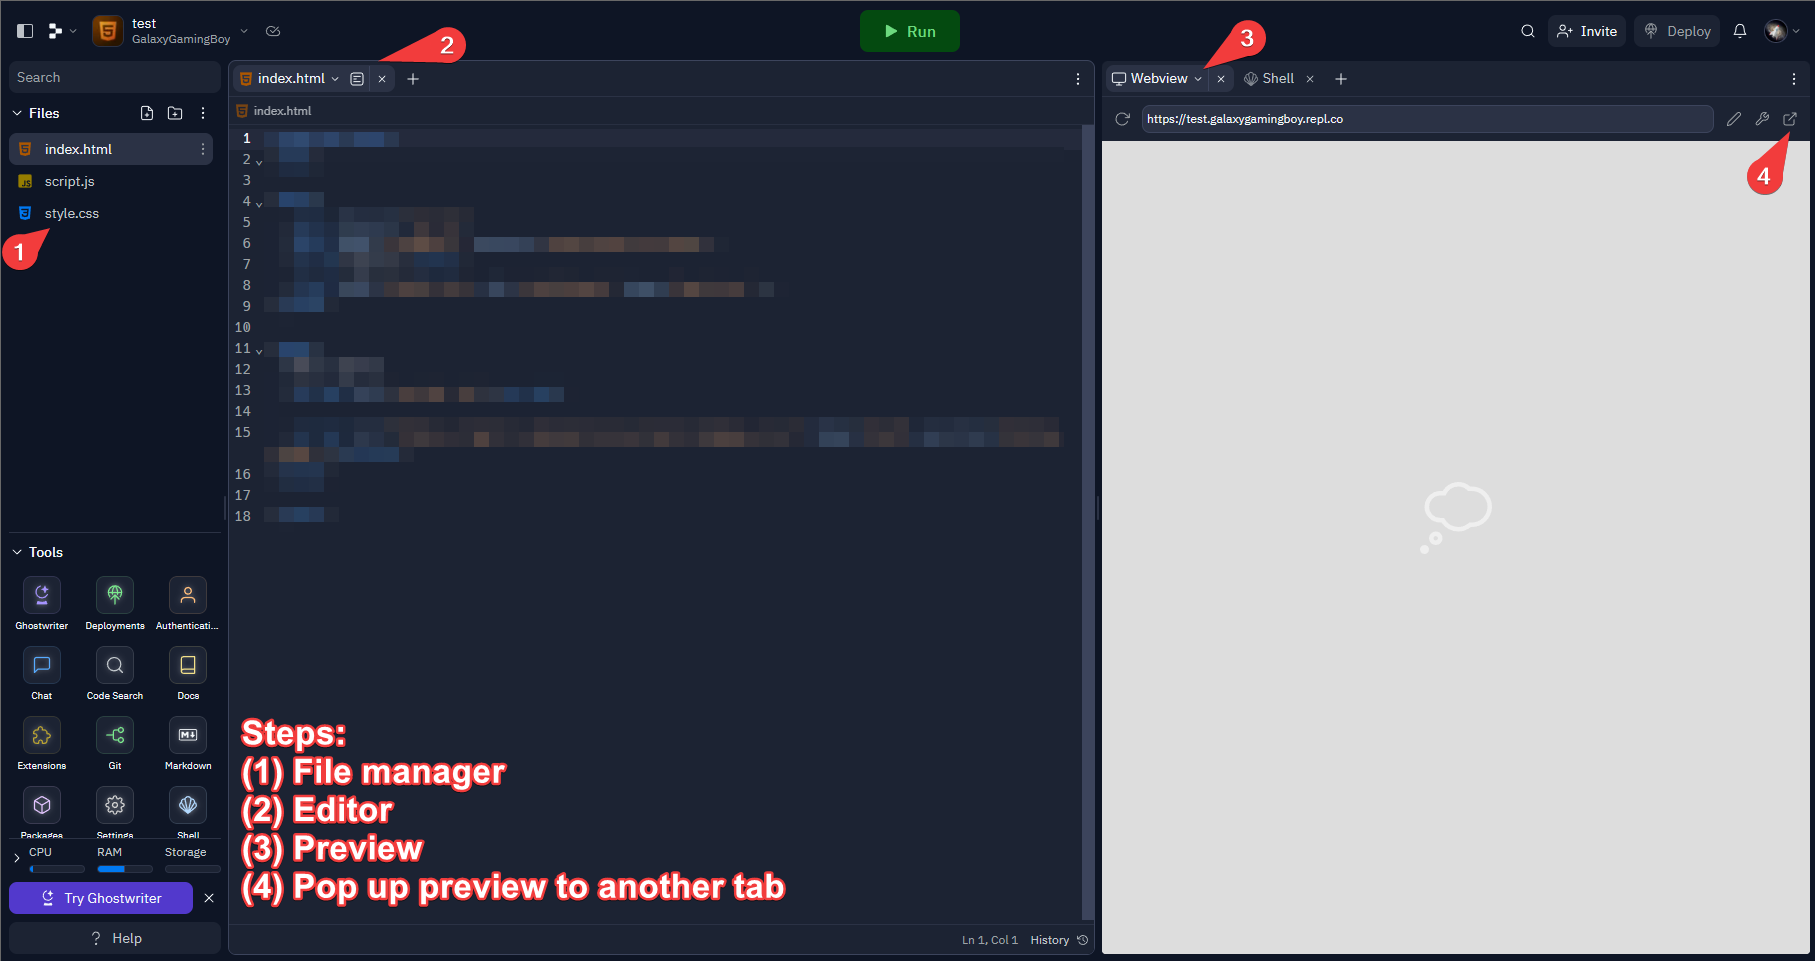 Bare with me for a bit while I explain the basics for replit, here are the breakdown of the steps shown above:
- Indicates the file manager, there you can see all of your files.
- Files opened with an editor below them.
- A preview window that will preview your animation, it should automatically reload if it doesn't press
RUN - Open the preview on another tab
Uploading assets
The process of uploading assets like images is very easy!
All you need to do is to drag and drop it into the assets folder ot wherever else in your project!
So yea, that's everything about replit, that you will need to know! Shall we get started with the template?
Quick explanation of the provided template
Phew I hope forking the project wasn't that hard because we got more to do! :D Let's start with a quick explanation of what the template provides us with:
- The necessary libraries, such us CCapture or gif worker, so we can record the video
- The bare necessary html code to get up and running fast and quick
- The assets folder where you can add your own assets to use
- Loading THREE.JS
The index.html
Let's quickly dissect the index.html so we have a basic understanding.
Feel free to skim this session if you have (or even don't have) time constraints!
<head>
    <meta charset="utf-8" />
    <meta name="viewport" content="width=device-width" />
    <title>Lofi Animation</title>
</head>
The head of the html file, provides the title and the viewport
<div>
    <button id="run">Run!</button>
    <button id="rec-start">Start Recording</button>
    <button id="rec-stop">Stop Recording</button>
    <span id="rec-status"></span>
</div>
Here we have the buttons
<!-- Import THREE.JS -->
<script
    async
    src="https://unpkg.com/es-module-shims@1.6.3/dist/es-module-shims.js"
></script>

<script type="importmap">
    {
        "imports": {
            "three": "https://unpkg.com/three@0.153.0/build/three.module.js",
            "three/addons/": "https://unpkg.com/three@0.153.0/examples/jsm/"
        }
    }
</script>
As the comments suggest here we import THREE.JS with its dependencies
<!-- Import CCapture -->
<script src="lib/CCapture.all.min.js"></script>
Here we import the CCapture which is found on the lib/
<!-- Replit badge for fun -->
<script
    src="https://replit.com/public/js/replit-badge-v2.js"
    theme="dark"
    position="bottom-right"
></script>
Then we add the Made with REPLIT badge in the bottom right corner
<!-- You script -->
<script src="script.js" type="module"></script>
We import our script.
Now let's move on to the script.js where our animation will exist.
const runButton = document.getElementById("run");
const startRec = document.getElementById("rec-start");
const stopRec = document.getElementById("rec-stop");
const statusRec = document.getElementById("rec-status");
stopRec.disabled = true // This will disabled the stop recording button, since we haven't started a recording
Here we just get the HTML elements, so we can use them.
// () => {} This is a arrow function
runButton.addEventListener("click", () => {
	runButton.disabled = true // Disables the run button
    // Executed on run
});

startRec.addEventListener("click", () => {
	startRec.disabled = true // Disables the start recording button
	stopRec.disabled = false // Enables the stop recording buttpn
    // Executed on start rec
});

stopRec.addEventListener("click", () => {
	startRec.disabled = false // Enables the start recording button
	stopRec.disabled = true // Disables the stop recording button
    // Executed on stop rec
});
And the event listeners when clicked.
 Phew that was a lot! But we can move over to the next session.
The code snippets are already implemented so no need to worry about that!
This section is purely informative.
Phew that was a lot! But we can move over to the next session.
The code snippets are already implemented so no need to worry about that!
This section is purely informative.
Now let's get to the meat of this jam!
THREE.JS Basics
This section will cover the basics of three.js, so you can start with the rendering.
Importing it
Yes, it's time! This is where we import THREE.JS for rendering. :D
If you had previous experience with Javascript you may already know how to import things but for those who don't, here is an explanatory Image.
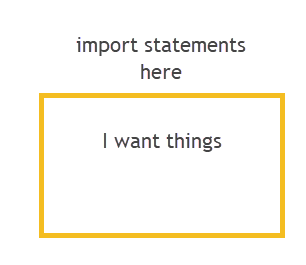 For those who have figured it out by the image congrats!
Imports are just requests to another javascript file saying that we want to load something from them.
For those who have figured it out by the image congrats!
Imports are just requests to another javascript file saying that we want to load something from them.
Now let's add them!
Your javascript lives on the script.js file. So all we got to do is add 1 import statements, well actually 3 because we also got to import the 3D model loader and the orbit controller.
Let's add these 3 lines to the start of the script.js.
import * as THREE from "three"; // Imports everything from THREE.JS
import { OrbitControls } from "three/addons/controls/OrbitControls.js"; // Imports the orbit controller
import { OBJLoader } from "three/addons/loaders/OBJLoader.js"; // Imports the 3D model loader
Creating a simple THREE.JS renderer
Well it is time! We will add one of the most crucial piece of 3D rendering. The RENDERER! It will handle, well, the rendering :D
Three.js makes this process a lot less tedious that it would normally be so let's jump into it.
In the script.js paste the following lines:
const renderer = new THREE.WebGLRenderer();
renderer.setSize(window.innerWidth, window.innerHeight);
document.body.appendChild(renderer.domElement);
In the first line we initialize the THREE WebGL renderer, it will handle the rendering job. In the second line we set the rendering size, and we pass the window width and height. In the third line we append the renderer, so we can actually see.

The coordinate system
Well let's make a quick reference to the three.js coordinate system.
Like mostly all 3D applications, three.js utilizes the Cartesian coordinate system.
Here is a quick illustration of it:
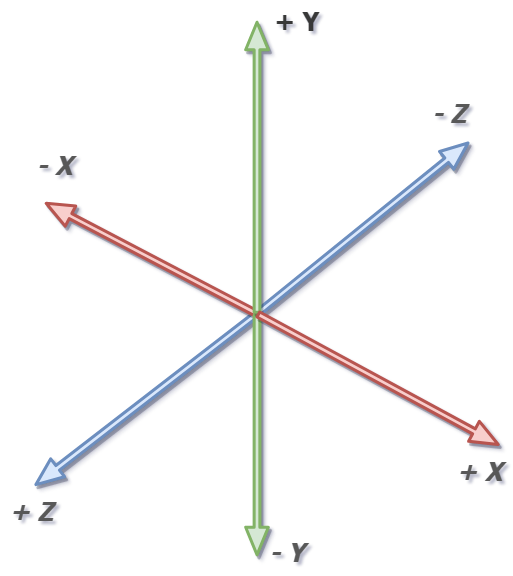 As shown above the height uses the Y variable, the depth uses the Z, and the width uses the X variable.
Well that is all you need to know about it! Let's render some cubes! :D
As shown above the height uses the Y variable, the depth uses the Z, and the width uses the X variable.
Well that is all you need to know about it! Let's render some cubes! :D
Adding a camera, sample cubes and cube animation!
Now, it's finally time to do the main part! :)
Adding a camera
We first need to add a camera, so we can render the scene! To create the camera we will also need a scene first, so let's add that!
Copy this line above the render code, in order to initialize a new scene
const scene = new THREE.Scene(); // Init Scene
Then we need to create and add the camera!
const camera = new THREE.PerspectiveCamera(
    50,
    window.innerWidth / window.innerHeight,
    0.1,
    1000
); // Init Camera

// Change camera position
camera.position.z = 16;
camera.position.y = 16 / 4;
A perspective camera has 4 parameters, here they are ordered start to finish:
- FOV: Camera frustum vertical field of view.
- ASPECT: Camera frustum aspect ratio.
- NEAR: Camera frustum near plane.
- FAR: Camera frustum far plane. For now use these defaults, if you want to learn more, click here
Now let's add a cube
That would be really easy actually! So what are you waiting for?
Below the renderer add these lines:
// Materials
const cubeMaterial = new THREE.MeshBasicMaterial({ color: 0xff0000 }); // We need to add a material, each material takes the arguement inside an object called color. It is in HEX.

// Add the objects
const cube = new THREE.Mesh(new THREE.BoxGeometry(1, 1, 1), cubeMaterial); // We create a new cube, by default it DOES not exist in the scene
BoxGeometry
Okay I did that, but what is THREE.BoxGeometry, you might say?
Box geometry is the size of the cube, each parameter is another dimension.
i.e. This cube is 1x1x1
Material
Okay okay, we got that figured out but what exactly does the MeshBasicMaterial do?
The MeshBasicMaterial is the material that the object will have.
The material will define its texture and color, so it is pretty important to know how to use it!
In three.js colors are stored in the HEX format, that is that they are made up from 3 different sections.
The first 2 decide the red value, the other 2 the green and the final 2 the blue!
But you might say, and rightfully so, why do they start with 0x and not # as like they are defined most of the time in web development?
That is because 0x defines that the value will be hex, and because JS doesn't natively support starting elements with # it is used instead of it.
TIP You may reuse the material for more than one cube, but if you want a different color ( or texture in the future ) split them into different variable. i.e. All wood blocks would use a woodMaterial but glass will use a glass material.
Adding it to our scene
If you click the run button now tho, you will see that the cube we made isn't visible in the scene! But why is that?
Well that issue occurs because we initialized our cube, but not added it to the scene. You see by initalizing something, you just create it in the computers memory but not added it to our virtual animation world also known as scene.
Here is a quick real life analogy, so we can understand it better.
If you think about it a pizza perfectly resembles our cube, because we can define it' shape, the BoxGeometry in our cube, and it's toppings, the MeshBasicMaterial in our cube.
But if we don't put it in the oven how are we going to bake it!
Just like pizza we must "bake" our cube, to "bake" our cube we need to put it in our virtual oven, the scene! In the run arrow function add the following lines:
scene.add(cube);
Now try clicking the RUN button on the browser after reloading, do you see the cube?
Try changing the THREE.BoxGeometry and the color of the material, do you see the cube size changing?
Changing the position and rotation
Now let's try to change the cube position and rotation. Each Three object has a position and rotation field, which each of them contains a xyz property.
After adding the cube to the scene copy this code before the renderer.render:
cube.position.x = 1;
cube.position.y = -1;
cube.rotation.x = 1;
The Rotation Unit
THREE.JS like some other 3d modelling tools, use radians for rotation.
This sadly makes it a bit hard to rotate objects for people who aren't used for them.
Thankfully three.js has a math function that will let us convert degrees to radians without thinking much!
THREE.MathUtils.degToRad(deg)
Just replace deg with the degrees you want. i.e. 180
Let's see a more in depth example:
cube.rotation.x = THREE.MathUtils.degToRad(90) // Rotate the X axis by 90 degrees
cube.rotation.z = THREE.MathUtils.degToRad(45) // Rotate the Z axis by 45 degrees
Animating the cube
The final piece of this section is the actual animation. In the function seen below, which has already been implemented for your convenience, thank me later :)
// Animate Scene
let tick = 0;
function animate() {
    requestAnimationFrame(animate);
    // ANIMATE STUFF HERE
    renderer.render(scene, camera);
    tick++;
}
Here we add a tick variable where we keep track of the time, this variable gets increased at the end of the function.
Then we request the frame, and render it.
Now we also need to call the function somewhere, because the function never terminates, a smart location to place it is at the end of the start function!
Let's make the cube rotate constantly!
After the requestAnimationFrame copy this code:
cube.rotation.x += 0.1;
This code increases the cubes X axis rotation by .1 radians.
Now after that add copy this code below:
if (tick % 64 > 31) {
    cube.position.x += 0.1;
} else {
    cube.position.x -= 0.1;
}
This code changes the cubes x position by 0.1 and then by -0.1. But why is that?
Explaining the formula
This might be a boring but necessary explanation, please bare with me for a bit..
Well behind the tick % 64 > 31 formula is a really smart way to do consistent rotation.
Let's start by dissecting the first part, tick % 64. If you think about it, the animation goes on forever, each frame the tick variable will be increased by 1. That is great for animations that stop after a while but for continuous animations there is a flaw, because we can't check if the tick is less than a value, let's say 32 more than one time.
But! with the modulo(%) operator we can, since every time we use it with a number, i.e. 64, the values will always be from the range of 0 to 63, no other exceptions. We can use that to our advantage, since half of the time (0 to 30) we will be going right and the other half of the time (31 to 63) we will go the other way, cancelling each other out!
Now
Well it is task time everyone!

Add Picture as cube surface
Yes you heard that right! Forget the boring colors, let's add real textures!
First upload your picture via dragging and dropping it in the assets/ folder.
I will name mine cube.jpg
First we need to create a loader to load the image. Copy this code above the materials.
const loader = new THREE.TextureLoader();
This just creates a loader, now we need to import the images.
In the cube material replace the:
color: 0x000000, with: map: loader.load('assets/cube.png')
i.e.
const cubeMaterial = new THREE.MeshBasicMaterial({ map: loader.load('assets/cube.png') });
That is it! Wasn't that easy?
Three.js must haves
Here are some features that you must have in your applciation.
Skybox
Well a black void is boring, I hope we can all agree with that!
A skybox was already in the template in the assets/skybox.png :D
Isn't that handy, you may replace it of course!
Now between the loader and the materials copy this code:
scene.background = loader.load("assets/skybox.jpg");
This will set the background to the assets/skybox.png, isn't that handy!
TIP: Make sure if you have time to find your own skybox, as to make your animation unique and to have a touch of your own personality! A place I have been using for a while now for skyboxes is Unsplashed, check it out! If you don't have time, feel free to keep using the default one.
Background Audio
Now let's add some audio. The audio takes place at the end of the run arrow function, just before the animate Copy this code into there:
const listener = new THREE.AudioListener(); // We create the listener
const soundSettings = new THREE.Audio(listener); // >> >> the audio settings
const audioLoader = new THREE.AudioLoader(); // >> >> the audio loader, so we can load the bg
camera.add(listener); // We attach it to the camera

audioLoader.load("assets/bg.mp3", function (buffer) {
    soundSettings.setBuffer(buffer);
    soundSettings.setLoop(true); // Set the audio to loop
    soundSettings.setVolume(0.5); // Audio volume
    soundSettings.play(); // Play Audio
});
Well that is it!
It will play the bg.mp3 that is located in the assets folder!
Camera rotations
I think we can agree that static cameras are boring so let's make ours to rotate!
So what are you waiting! After the initialising the render copy these lines:
// Controls
const controls = new OrbitControls(camera, renderer.domElement); // Create control
controls.target.set(0, 0.5, 0); // Set target
controls.update(); // Update it
controls.enablePan = false; // Disable pan
controls.enableDamping = true; // Enable damping
Now the last thing we need to do is call it at the end of our render function! Just copy this line, before the render!
controls.update();
Congrats! Now you can rotate the camera! Isn't that fun!
We are so near the end of our sessions so please wait a bit more before you can master Voxel animations :D
The recording
Phew it is almost time for your solo adventure.
Adding the capturer
Well the first thing we need to do is add the capturer, so we can use it. Copy this code just after the imports:
var capturer = new CCapture({
    format: "webm",
    workersPath: "/lib/",
    verbose: true,
    framerate: 60,
}); // Format may be: GIF, WEBM, PNG, JPG
Feel free to change the video format.
Now we need to add one more line just before the renderer.render function call on the animate method. Copy this line:
capturer.capture(renderer.domElement);
Start the recording
To start the recording it is very simple!
On the Executed on start rec comment copy these lines:
capturer.start(); // Start the capturer
statusRec.innerText = "Recording in progress"; // Update the status
Well that is everything you need to add to start the recording, now let's end and save it.
Stop the recording
Well again on the Executed on stop rec comment copy these lines:
capturer.stop(); // Stop rhe capturer
capturer.save(); // Save the recording
statusRec.innerText = "Saving recording... This *may* take a while"; // Update status
WARNING FOR ADVENTURERS: THE CAPTURE FUNCTIONALITY WORKS ONLY WHEN THE PREVIEW IS OUTSIDE REPLIT.
Start of your SOLO adventure
It is finally time! I hope you learned enough to start on your own. Just remember these tips!
TIPS
1) Save all objects into variables
2) Create new materials for new objects, reuse materials for similar ones
3) Add objects to the scene on the run methid
4) Change object position.rotation on run method *after* adding them to the scene.
5) Use the tick variable to keep track of time in your animations
6) Feel free to seek the demo code for more examples
If you would like to learn how to add more shapes to use in your lofi animation, check out the jam's note, printed or digitally. They can also be found here
Farewell traveler!

But before I leave here are some useful materials.
Note for advanced adventures: This file will continue on adding your own 3D .objs, as well as lighting and scaling. If you have more time, you are free to check them out.
3D Models
Well hello there! It looks like you wanted to learn more, let's start with 3D models.
Creating your own 3D model
I suggest using [this](Goxel 0.10.5) tool for creating a 3D voxel model, because it is easy to use and it is online.
After creating a model follow this guide:
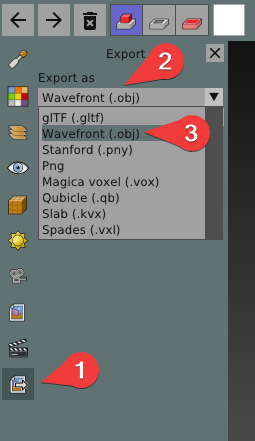 Instructions as show above:
- Click the image button, it is known as export
- Click the
export asdropdown - Click
Wavefront (.obj)
After clicking export, save and upload the .obj
Then upload it into the assets/ folder.
Loading the model
Now upload the model loader, copy this line after the texture loader.
const modelLoader = new OBJLoader();
Then after all of the scene.add calls, load the model like this, change the name.obj to your .obj name.
modelLoader.load(
    "assets/name.obj",
    (obj) => {
        console.log("Model: NAME, loaded");
        // Change position, rotation, scale here
        obj.position.x = -1;
        scene.add(obj);
    },
    undefined,
    undefined
);
Well that is it for loading 3D models! You should now see it, but we have a slight problem, uhhh, it is a bit oversized isn't it, let's fix that.
Object Lighting and Scaling
Scaling
As you saw the model is a bit too large to fit in to the scene, so let's change its scale. On the arrow function change you can manipulate its position, rotation or scale!
To scale you will use the .scale.set(x, y, z) method.
i.e.
obj.scale.set(0.1, 0.1, 0.1); // Set's the object xyz scale to .1
Now let's implement it to the model:
modelLoader.load(
    "assets/name.obj",
    (obj) => {
        console.log("Model: NAME, loaded");
        // Change position, rotation, scale here
        obj.position.x = -1;
        obj.scale.set(0.1, 0.1, 0.1);
        scene.add(obj);
    },
    undefined,
    undefined
);
That should be it, but uhhh, new issue. The model is black, without any color.
Lighting
Well to see it, you need lighting! :D
For that THREE.JS has a light object, here is how to declare and add it in the scene.
Copy this code at the end of the scene.add calls:
scene.add(new THREE.AmbientLight(0xFFFFFF, 1)); // Add light so we can see the models
Well now you should be able to see the models! And you now have reached the end! Congrats! I hope you make a fine and awesome jam. I know you can do it!
Congratulations! 🎉 🎉 🎉If you're a highschooler who enjoys programming or tinkering with hardware, make sure to join Hack Club, the world's largest nonprofit empowering teenagers to make cool projects! There's tons of programs where you can get prizes for programming, get your hardware projects fully funded and you can join the awesome community of 100k+ teenagers who love making cool stuff (just like you!).